iPhone & iPad Apps for the Blind &VisuallyImpaired

Saturday, December 24, 2016

Keep your notes secure with password-protection

You can secure the notes that contain your most personal data—such as financial details, medical info, or website logins—with a password or fingerprint.

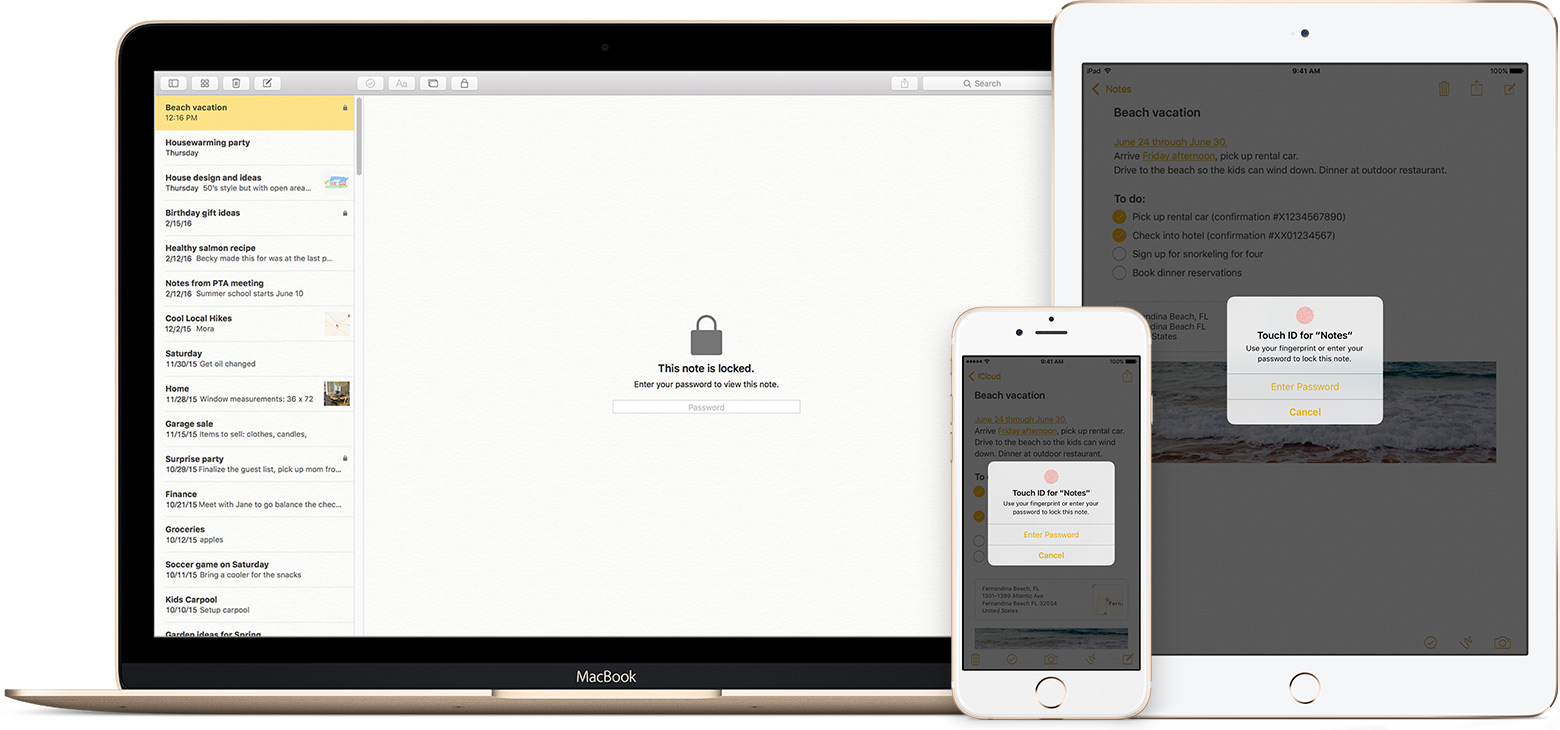
The Notes app lets you lock any note that you want to keep private from anyone else that might use your device. Notes uses a single password for all of the notes that you want to protect, on all of your devices. And if you have an iPhone or iPad with Touch ID, you can use your fingerprint to open your locked notes.

Before you begin

Set up your notes password

Before you can lock your notes, create a password that you can easily remember. If you're concerned about forgetting your password, make sure that you give yourself a password hint and that you set up Touch ID. If you forget your password, Apple can't help you reset it.
If you access your iCloud notes on more than one Apple device, you'll use the same notes password to lock and unlock all of them.

On your iPhone, iPad, or iPod touch

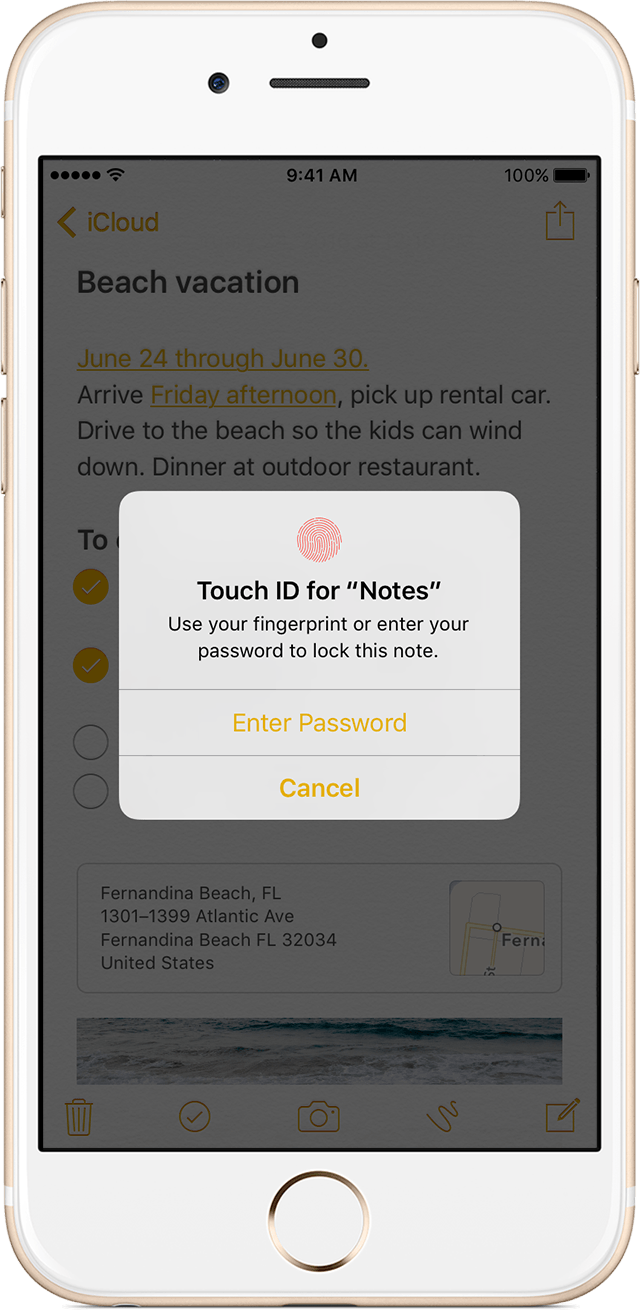
You can create a password in your device Settings or directly in the Notes app. Then you can turn on Use Touch ID on your iPhone or iPad, so that you can use your fingerprint to unlock your protected notes.

Create a password in Settings

  1. Go to Settings > Notes.
  2. Tap Password.
  3. Enter a password, then give yourself a password hint.
  4. Tap Done.

Create a password in Notes

  1. Open a note that you want to lock.
  2. Tap Share icon > Lock Note.
  3. Enter a password, then give yourself a password hint.
  4. Tap Done.

On your Mac

You can create a password on your Mac directly in the Notes app. In the menu bar, click Notes > Set Password. Enter a password, then give yourself a password hint and click Done.

Use Notes password-protection

Whether your note has an image, sketch, map, URL, or list of important information, it's simple to keep it safe with password-protection. And when you need to access your secure notes, you can tell which ones are locked directly from the Notes list. Just look for the  next to the note. Until you enter your password or use Touch ID, you only see the title and the last date that it was edited.
You can't password-protect notes that you share with someone else. If you want to stop sharing a note, open , then tap or click Stop Sharing.
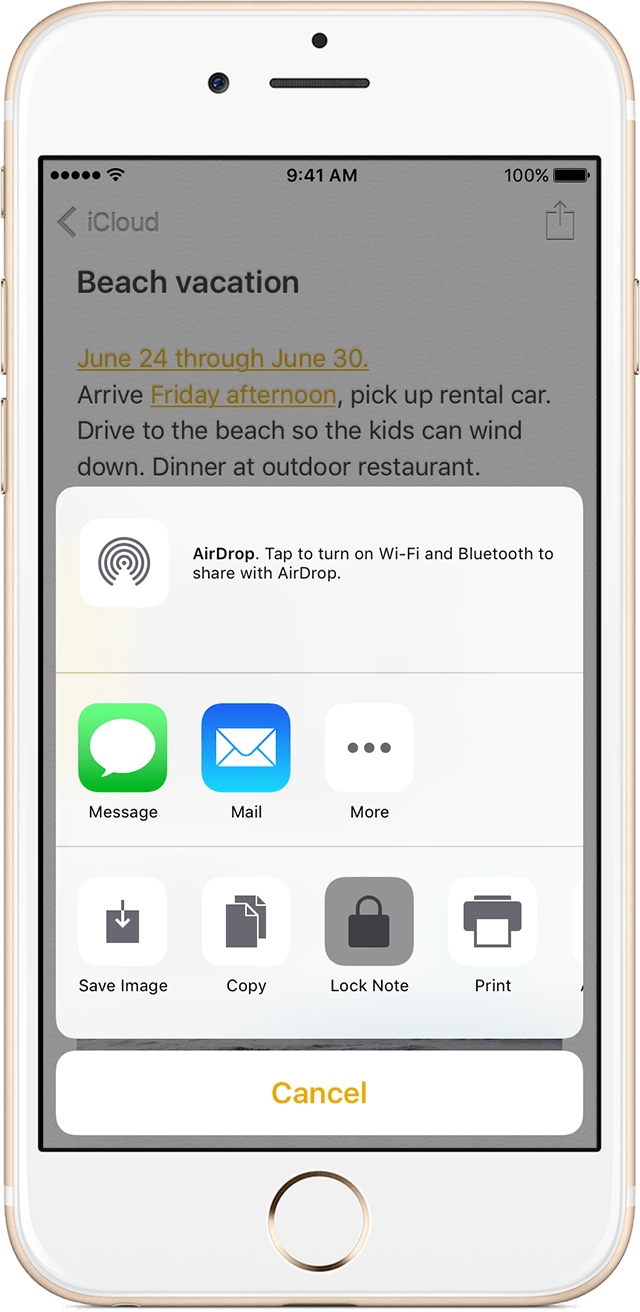
     

Lock a note

On your iPhone, iPad, or iPod touch:
  1. Open the note that you want to lock.
  2. Tap Share icon .
  3. Choose Lock Note.
After you lock your note, it stays open and you'll see unlocked notes icon at the top of the screen. You can hide the note's contents when you tap .
On your Mac:
  1. Open the note that you want to lock.
  2. Click lock notes icon.
  3. Choose Lock Note.
You can only lock notes on your device and notes in iCloud. You can't lock notes that have PDFs, audio, video, Keynote, Pages, Numbers documents, or notes that use IMAP to sync (like Yahoo!, Gmail, and Hotmail).
     

Open a locked note

On your iPhone, iPad, or iPod touch:
  1. Tap the locked note.
  2. Tap View Note.
  3. Enter your password or use Touch ID.
On your Mac and iCloud.com:
  1. Click the locked note.
  2. Enter your password.
Your locked notes stay open for up to three minutes, making it easy for you to jump to another note, copy and paste information from other apps, and more. If you close the Notes app or your device goes to sleep, the note locks again.
     

Remove a lock

On your iPhone, iPad, or iPod touch:
  1. Tap the locked note.
  2. Enter your password or use Touch ID.
  3. Tap Share icon.   
  4. Choose Remove Lock.
On your Mac:
  1. Click the locked note.
  2. Enter your password.
  3. Click .   
  4. Choose Remove Lock.
When you remove a lock from a note, it's removed on all of the devices that you're signed in to with the same Apple ID.

Change your password

On your iPhone, iPad, or iPod touch:
  1. Go to Settings > Notes > Password.
  2. Tap Change Password.
  3. Enter your old password, then enter a new password and password hint.
On your Mac:
  1. Open Notes.
  2. In the menu bar, choose Notes > Change Password.
  3. Enter your old password, then enter a new password and password hint.
  4. Click Change Password.

If you forgot your notes password

You can unlock a note only when you enter the password that it's locked with. If you forgot your password, Apple can't help you regain access to your locked notes.
You can reset your password, but this won’t give you access to your old notes. It will, however, let you password protect any notes that you create from that point forward with the new password. This could lead to you having multiple notes with different passwords.
If you have multiple passwords, you can't tell which password you should use when you look at your notes in the Notes list. When you open a note locked by your old password but enter your current password, you'll see an alert that you entered the wrong password with a hint for your old one. If you then enter the correct old password, you get the option to update that note's password to your current one.

Reset your notes password

When you reset your Notes password, it doesn't delete or change the password of your notes that are already locked. If you have a note that uses an old password, you can update it to the new password when you enter the old password, remove the old password, then apply your new password to the note.
On your iPhone, iPad, or iPod touch:
  1. Go to Settings > Notes > Password.
  2. Tap Reset Notes Password.
  3. Enter your Apple ID password.
  4. Tap Reset Notes Password again.
  5. Enter your new password and password hint.
On your Mac:
  1. Open Notes.
  2. In the menu bar, click Notes > Reset Password > OK.
  3. Enter your Apple ID password.
  4. Click Reset Password.
  5. Enter your new password and password hint.

Tuesday, December 6, 2016

How to change your Mac computer’s name

How to change the name of your Mac

Step 1: In the Menu bar, go to  > System Preferences…
Step 2: Click on Sharing.

Step 3: In the Computer Name box, type in the name you want to use for your computer.
Step 4: Close the window, and you’re done.
As always, feel free to ask if you have any question.

Sunday, December 4, 2016

to have your iPhone announce who’s calling you running iOS 10

Among the 100+ new features in iOS 10 is the ability to have your iPhone announce who’s calling when receiving a phone call. Based on the caller ID, your iPhone will vocalize the name of the caller, or tell you it’s an unknown caller in case the number isn’t in your contacts.

This is a nice little addition that can actually be configured in the Settings.

On your iPhone, launch the Settings app, and navigate to the Phone tab, then tap on Announce Calls.

announce-calls-iphone

From there you can specify under what circumstances your iPhone should announce calls. You can choose to have it name the caller for every call, only for calls received when you’re in your car or wearing headphones, only for calls you receive when wearing headphones, or simply never.

This new feature is particularly handy when walking with headphones on. You won’t have to reach for your phone to find out who’s calling. Instead, assuming the caller is in your contacts, Siri will announce the name of the caller.


Wednesday, November 23, 2016

Chelsea Ann Stark: Hotmail And iPhone4s Frenzy


Chelsea Ann Stark: Hotmail And iPhone4s Frenzy
If you have a Hotmail email account you probably went through this Tuesday, November 22, 2016.
To read this post please go to http://chelseaannstark.blogspot.com/2016/08/hotmail-and-iphone4s-frenzy.html


Saturday, November 5, 2016

Be My Eyes - helping blind see app

Be My Eyes is an app that connects blind and visually impaired with sighted helpers from around the world via live video 

Monday, October 17, 2016

Why should blind or visually impaired people choose Apple's Products?


This post will contain some testimonials and segment on why they chose apple products.


Matthew
They are stable, their operating systems are reliable. All the Apple stuff I have owned seems to be built tough. Also right now, Apple is at the top of excess ability. Most stuff ends up being accessible. Gestures for navigation are easy to learn and teach  to other people.

Trish
For me, it's about the fact they're fully built to be usable to people with any disability. You don't need to pay extra, nor argue with a system that just doesn't work quite right.
I personally feel that Apple has always been making it possible for the blind, deaf, visually impaired and the hearing impaired to function in the world of smart technology.  Just look at their latest release.  

Sure there are some bugs, but they totally have the market on accessibility.  People should always do research and do what is best for them.  
No need to fly flags about it, just do what is best for you.
For me, it's about the fact they're fully built to be usable to people with any disability. You don't need to pay extra, nor argue with a system that just doesn't work quite right. Every app that can be is accessible, and they're truly focused on making everything usable, rather than just losing money because they're hard to use. 
Apple products are designed with accessibility included. There is minimal setup required. In my experience, Apple products have more accessibility features built in than Windows or Android.

Carlene  
Apple has more apps for blind or impaired vision. I have had both Android and now a Apple and love apples iOS system. Android does not offer a lot of the apps that iOS does. 
 And at this time I feel that Apple  is the  best and will stay with apples iPhone.
 
Dick
 I am visually impaired myself and  have a Generation 1 apple watch and i think it's great. On the apple watch there is a watch face with extra large digits, secondly you can make the watch speak the time and with SIRI and Voice Over enabled it is a great watch for visually impaired people.

Taylor  
For me, it's about the fact they're fully built to be usable to people with any disability. You don't need to pay extra, nor argue with a system that just doesn't work quite right. Every app that can be is accessible, and they're truly focused on making everything usable, rather than just losing money because they're hard to use.

Sandra
The iPhone might be a status symbol I think with some sighted people. As for me as a blind person, I saw my nieces Samsung galaxy. It was definitely more confusing than the iPhone. Now I have learned the iPhone so instead of trying to find something else I need to try to learn, I've basically stuck with that. I do think that lots of blind folks in the beginning purchased the iPhone because of the excess ability, not because of the status symbol.  


Permenter  
In my case I like iPhone zoom function I can zoom anything and I don't use VO very often. But I do have to invert the colors  and its way easier with my iPhone than it was with android. I could care less about being a "status symbol"

Alex  
Because it is the easiest and best smartphone for the visually impaired.


Ann
For me, it's about the fact they're fully built to be usable to people with any disability. You don't need to pay extra, nor argue with a system that just doesn't work quite right.
I personally feel that Apple has always been making it possible for the blind, deaf, visually impaired and the hearing impaired to function in the world of smart technology.  Just look at their latest release.  

Sure there are some bugs, but they totally have the market on accessibility.  People should always do research and do what is best for them.  
No need to fly flags about it, just do what is best for you.
For me, it's about the fact they're fully built to be usable to people with any disability. You don't need to pay extra, nor argue with a system that just doesn't work quite right. Every app that can be is accessible, and they're truly focused on making everything usable, rather than just losing money because they're hard to use. 
Apple products are designed with accessibility included. There is minimal setup required. In my experience, Apple products have more accessibility features built in than Windows or Android.

Teresa
Apple products are designed with accessibility included. There is minimal setup required. In my experience, Apple products have more accessibility features built in than Windows or Android.
------------------


Gerry
I have been using Apple products for about 6 years. I have an iPhone 6 and an iPad mini. I am able to use a smartphone now, where before I couldn't. Voice Over is a built in screen reader that works quite well. I listen to Bard Moblie, Audible.com and music all from my iphone with the help of a bluetooth speaker. I also check my emails and send and recieve text messages. Oh btw I am almost totally blind.

Diane
Basically, Apple products can be used right out of the box. Might cost a bit more but if you include screen readers for other products you're still paying around the same.

Bridget  
In my case I like iPhone because I can zoom anything and I don't use VO very often but I do have to invert the colors  and its way easier with my iPhone than it was with android. I could care less about being a "status symbol"

Alex  
Because it is the easiest and best smartphone for the visually impaired.

Victoria  
Well, I can tell you that I use an iPhone because it is extremely user-friendly for me. I don't have to struggle to figure out how to do things. Voiceover is reliable and many many apps are accessible with it. I can rest a short that every app made by Apple will be accessible.

Barry 
After listening to lots of reviews by visually impaired people , it seemed that the iPhone was the simplest to use for those of us who cannot actually see what's on the screen at all. That is why I bought mine, and I am very, very pleased that I did. …And people hardly ever see my phone so it most certainly is not a status symbol in my case…

Ann 
I have lost all of my high partial vision to retinitis pigmentosa several years ago. When I got  my iPhone, I felt like I've been given my vision back in someways. Not everyone can get a computer from blind services and similar organizations.
To me, and I phone is just perfect for what I wanted to do for me. For many years, I had net by phone and Internet speech. I wish someone had told me back then, that an iPhone had speech on it I could've save myself a lot of $$.


Wednesday, September 14, 2016

How to improve iOS 10 Battery Life

f you’ve upgraded your iPhone, iPad or iPod touch to iOS 10, and are facing battery life problems then check out the tips after the break to see if they help in fixing the problem.
iOS 10 comes with a number of new features such as major updates to the Messages app, new Home app, all-new Photos, Music and News apps Siri integration with some types of third-party apps, VoIP calls integration in the Phone app, and lots more. So it is possible that features such as  The problem with battery Life issues is that it is very subjective as it is based on your usage pattern, so it is difficult to pinpoint what exactly is causing a problem.  Note: I’ve noticed that people are quite cynical about such articles as most of them tell you to disable features. The aim of the article is not to tell you to disable features on your iPhone, but the purpose is to provide you information about the various settings that are available, so you can disable the features that you don’t use as it would help in extending your iPhone’s battery life.

Tips to Fix iOS 10 Battery Life Problems


1. Battery usage

The first step in fixing the battery problems is to understand battery usage. iOS gives you a breakdown of battery usage by apps. It even gives you the amount of time the app was used and the amount of time it was running in the background. You can use that information to identify the battery hogs.

    How to find battery usage


    • Launch the Settings app
    • Tap on Battery


    • 2. Push Email

      Push email can be a primary cause of battery drain on some devices. To identify if your email is Push or Fetch, launch the Settings app, and navigate to Mails, Contacts and Calendars > Fetch New Data. You need to check if the email account has been set as Push, Fetch or Manual.


      Push ensures that you get an instant notification when you get a new email, whereas Fetch will look for new data 15 minutes, every 30 minutes, hourly or when you launch the Mail app (manually). You may want to disable Push email temporarily for your email accounts to see if it improves battery life.
      Alternatively, if you use multiple email accounts then you may want to disable Push for email accounts where you don’t need to get an instant notification for new email, and switch to Fetch. The higher the fetch interval, the better it is for battery life, so you can set it appropriately based on the importance of the email account.

      3. Background App Refresh

      iOS’ smart multitasking feature lets apps fetch content in the background. Although Apple has made a lot of optimizations to ensure that battery consumption is minimal, it’s possible that poorly developed app can drain battery life due to this feature. To disable Background App Refresh go to Settings > General > Background App Refresh > and turn it off for apps that don’t absolutely need to be updated all the time. Background App Refresh is a great feature, but you don’t need it for every app. I would strongly recommend turning it off for the Facebook app as it is known to drain battery life.


      4. General Tips

      Please note that the tips under section are to highlight areas where you could disable things that are not applicable to you so you can maximize battery life. We are not recommending or advising you to disable features just for battery life, as then there would be no point in using smartphones like the iPhone.

      Remove Unwanted Widgets

      Swipe right from the edge of the Home screen or Lock screen to open Today View. You can add widgets to the Today View to get timely information from your favorite apps, however, they can drain battery life since they fetch data in the background to show up-to-date information. You should review the list and remove the widgets that you don’t want to ensure they don’t consume battery life unnecessarily as some of them could be using Location services.
      Swipe down from the top edge of the screen to access Notification Center. Then swipe to the left to access the Widget tab, scroll down and tap on Edit button. Tap on the red button to remove the widget from the Notification Center.

      Turn off Dynamic Wallpapers

      Dynamic wallpapers bring subtle animations to the Home and the Lock screen. Unfortunately, the animations take up CPU cycles and consume more battery. So if you have set a dynamic wallpaper, and you’re having battery issues, go to Settings > Wallpaper > Choose Wallpaper where you can go to either Stills or your set an image from your photo library as your wallpaper.

      Disable Motion Effects, Parallax

      Apple added a number of animations and physics-based effects to the interface in iOS 7 to help users understand the layered elements in the UI. Some of these effects even access gyroscopic data, which contributes further to battery drain. You can disable these motion effects by going to Settings > General > Accessibility > Reduce Motion and turn on the switch.

      Disable App Store’s Automatic Updates

      App Store automatic installs app updates in the background, but if you’re not too keen on updating all your apps, you can turn this off by going to Settings > iTunes and App Store > scroll down to the Automatic Downloads section and turn off the “Updates” switch. While you’re there, you can also tell iOS to not use cellular data for automatic downloads and iTunes Match streaming.

      Disable unwanted indexing in Spotlight search

      Spotlight searches a lot of types of content like Applications, Contacts, Music, Podcasts, Mails, Events etc., when you might use it only for contacts, applications, and music. So uncheck the type of content you don’t want to search by going to Settings > General > Spotlight Search.

      Turn off Push Notifications

      If you receive a lot of push notifications, your battery can take a hit, so make sure you turn off push for apps that you don’t frequently by navigating to Settings > Notifications > Scroll down to the Include section to see the list of apps and tap on any of them to turn notifications off.

      Other tips

      • If you don’t connect Bluetooth devices to your iPhone then turn it off (Settings -> General -> Bluetooth)
      • Set Auto-Lock interval so that your iPhone will turn off more quickly after a period of inactivity. To set the auto-Lock interval, launch the Settings app, tap on General and then Auto-Lock and set the auto-lock interval to either 30 seconds, 1, 2, 3, 4 or 5 minutes.
      • You’re probably aware that using Wi-Fi drains iPhone’s battery, but perhaps you didn’t know that one of the most intensive processes that iPhone’s Wi-Fi chip has to do is search for available network. So if this happens in regular intervals, it’s going to have a noticeable impact on your battery. To disable this feature, launch the Settings app, tap on Wi-Fi, and tap on the On/Off toggle for Ask to Join Networks to disable it. Please note that by disabling this feature, your iPhone will join known Wi-Fi networks automatically, but you will have to manually select a network if no known networks are available. Note: It is disabled by default.
      • Dimming the screen helps to extend battery life. You can either lower the default screen brightness based on your preference or turn on Auto-Brightness to allow the screen to adjust its brightness based on current lighting conditions. Launch the Settings app, scroll down and tap on Brightness & Wallpaper and set Auto-Brightness to On. Note: Apple enables it by default.
      • Turn off Location services for the following System System services: Diagnostics & Usage, Setting Time Zone, Location Based iAds (Settings -> Privacy -> Location Services -> System Services).

    • 5. Location Services

      When we install apps, they prompt us to give them access to various things such location etc., and we tend to blindly say yes. However, apps using location services can have a major impact on battery life. So you may want to review which apps should have access to your device’s location. The best way to approach this is to first disable location services for all the app. You can disable location services via the Settings app and navigate to Privacy > Location Services. After you’ve disabled location services for all apps, you identify which apps such as navigation apps should use location services and enabled them individually.

      Use Location Only While Using the app

      In iOS, you can allow apps to use Location Services only while using the app, so the apps don’t use it all the time. This can be useful for apps like the App Store, which don’t need to be using location services all the time.
      You can see which applications have recently used location services by going to Settings > Privacy > Location Services. Apps that recently used your location have a purple compass-like indicator next them. Tap on the app, you should see the While Using the App, tap on it if you want the app to use location services only while using the app. This will ensure that the app will access your location only when it or one of its features are visible on the screen. As you can see below, iOS also tells you the App Store app is using location services to “find relevant apps nearby”.   Developers need to add support for this feature, so you may not find this option for all apps. If you’ve accidentally disabled location services for an app that needs to use it, don’t worry, it will prompt you to give access to Location Services when you launch it. I would strongly recommend change the setting to While Using the App for the Facebook app to prevent it from draining battery life.

      6. Place your iPhone Facedown

      iOS includes a new facedown detection feature, which makes use of the ambient light sensor to ensure the display doesn’t light up when you receive a Notification when you place the iPhone facedown. The feature along with other refinements helps in improving battery life by an additional hour as it turns off the display when not in use. So when you place your iPhone on the table, you should place it facedown to conserve battery life. Please note the Facedown Detection feature is available only on iPhone 5s or later devices.

      7. Check Cell Signal

      If you live or work in an area that has poor or no LTE coverage or your carrier doesn’t offer LTE yet, then you should consider switching to 3G to prevent the LTE radio from draining battery life unnecessarily. To switch to 3G, navigate to Settings -> General -> Cellular/Mobile -> Enable LTE/Enable 4G and tap on the Off option.

      8. Use Low Power Mode

      If your device is running low on battery, and you still have some time to get to a power source, then you could enable the all-new Low Power mode by going to Settings > Battery and tapping on the toggle. Low Power Mode temporarily reduces power consumption by turning off or reducing mail fetch, background app refresh, automatic downloads, and some visual effects. Apple states that Low Power Mode mode can extend battery life by an additional 3 hours.  You will also get a prompt to enable Low Power Mode when you hit 20% battery remaining, and will automatically disable it when battery remaining crosses 80%.


      9 Troubleshooting

      Restart/Reset Your iPhone

      Hold down the Sleep/Wake button and the Home button at the same time for at least ten seconds, until the Apple logo appears.

      Resetting Network Settings 

      Reset network settings by tapping Settings -> General -> Reset -> Reset Network Settings. This will reset all network settings, including passwords, VPN, and APN settings.

      Battery Maintenance

      Apple advices users to go through at least one charge cycle per month (charging the battery to 100% and then completely running it down). So if you haven’t done it already, it may be a good time to do it. Power cycling your device helps in recalibrating the battery indicator more accurately.

      10. Restore iPhone as New

      This is not ideal but the last resort. If you’ve setup your iPhone by restoring from backup then the battery life problems could be due to some issue with the backup. Try to restore your iPhone (Settings -> General -> Reset -> Erase All Content And Settings) and set it up as a new iPhone (not from the backup). But before you erase all the contents and settings, take a backup of your iPhone using iTunes or iCloud, or selectively take a backup of your photos and videos using Dropbox or Google+.
      We’ve seen quite a few comments from readers who have found that the battery life is better after setting up the device as a new iPhone/iPad/iPod touch.
      Did you face battery life problems after upgrading to iOS 10? Did any of these tips help? Let us know in the comments.
      Like this post? Share it!

      How to improve iOS 10 Battery Life

      f you’ve upgraded your iPhone, iPad or iPod touch to iOS 10, and are facing battery life problems then check out the tips after the break to see if they help in fixing the problem.
      iOS 10 comes with a number of new features such as major updates to the Messages app, new Home app, all-new Photos, Music and News apps Siri integration with some types of third-party apps, VoIP calls integration in the Phone app, and lots more. So it is possible that features such as  The problem with battery Life issues is that it is very subjective as it is based on your usage pattern, so it is difficult to pinpoint what exactly is causing a problem.  Note: I’ve noticed that people are quite cynical about such articles as most of them tell you to disable features. The aim of the article is not to tell you to disable features on your iPhone, but the purpose is to provide you information about the various settings that are available, so you can disable the features that you don’t use as it would help in extending your iPhone’s battery life.

      Tips to Fix iOS 10 Battery Life Problems


      1. Battery usage

      The first step in fixing the battery problems is to understand battery usage. iOS gives you a breakdown of battery usage by apps. It even gives you the amount of time the app was used and the amount of time it was running in the background. You can use that information to identify the battery hogs.

        How to find battery usage


        • Launch the Settings app
        • Tap on Battery


        • 2. Push Email

          Push email can be a primary cause of battery drain on some devices. To identify if your email is Push or Fetch, launch the Settings app, and navigate to Mails, Contacts and Calendars > Fetch New Data. You need to check if the email account has been set as Push, Fetch or Manual.


          Push ensures that you get an instant notification when you get a new email, whereas Fetch will look for new data 15 minutes, every 30 minutes, hourly or when you launch the Mail app (manually). You may want to disable Push email temporarily for your email accounts to see if it improves battery life.
          Alternatively, if you use multiple email accounts then you may want to disable Push for email accounts where you don’t need to get an instant notification for new email, and switch to Fetch. The higher the fetch interval, the better it is for battery life, so you can set it appropriately based on the importance of the email account.

          3. Background App Refresh

          iOS’ smart multitasking feature lets apps fetch content in the background. Although Apple has made a lot of optimizations to ensure that battery consumption is minimal, it’s possible that poorly developed app can drain battery life due to this feature. To disable Background App Refresh go to Settings > General > Background App Refresh > and turn it off for apps that don’t absolutely need to be updated all the time. Background App Refresh is a great feature, but you don’t need it for every app. I would strongly recommend turning it off for the Facebook app as it is known to drain battery life.


          4. General Tips

          Please note that the tips under section are to highlight areas where you could disable things that are not applicable to you so you can maximize battery life. We are not recommending or advising you to disable features just for battery life, as then there would be no point in using smartphones like the iPhone.

          Remove Unwanted Widgets

          Swipe right from the edge of the Home screen or Lock screen to open Today View. You can add widgets to the Today View to get timely information from your favorite apps, however, they can drain battery life since they fetch data in the background to show up-to-date information. You should review the list and remove the widgets that you don’t want to ensure they don’t consume battery life unnecessarily as some of them could be using Location services.
          Swipe down from the top edge of the screen to access Notification Center. Then swipe to the left to access the Widget tab, scroll down and tap on Edit button. Tap on the red button to remove the widget from the Notification Center.

          Turn off Dynamic Wallpapers

          Dynamic wallpapers bring subtle animations to the Home and the Lock screen. Unfortunately, the animations take up CPU cycles and consume more battery. So if you have set a dynamic wallpaper, and you’re having battery issues, go to Settings > Wallpaper > Choose Wallpaper where you can go to either Stills or your set an image from your photo library as your wallpaper.

          Disable Motion Effects, Parallax

          Apple added a number of animations and physics-based effects to the interface in iOS 7 to help users understand the layered elements in the UI. Some of these effects even access gyroscopic data, which contributes further to battery drain. You can disable these motion effects by going to Settings > General > Accessibility > Reduce Motion and turn on the switch.

          Disable App Store’s Automatic Updates

          App Store automatic installs app updates in the background, but if you’re not too keen on updating all your apps, you can turn this off by going to Settings > iTunes and App Store > scroll down to the Automatic Downloads section and turn off the “Updates” switch. While you’re there, you can also tell iOS to not use cellular data for automatic downloads and iTunes Match streaming.

          Disable unwanted indexing in Spotlight search

          Spotlight searches a lot of types of content like Applications, Contacts, Music, Podcasts, Mails, Events etc., when you might use it only for contacts, applications, and music. So uncheck the type of content you don’t want to search by going to Settings > General > Spotlight Search.

          Turn off Push Notifications

          If you receive a lot of push notifications, your battery can take a hit, so make sure you turn off push for apps that you don’t frequently by navigating to Settings > Notifications > Scroll down to the Include section to see the list of apps and tap on any of them to turn notifications off.

          Other tips

          • If you don’t connect Bluetooth devices to your iPhone then turn it off (Settings -> General -> Bluetooth)
          • Set Auto-Lock interval so that your iPhone will turn off more quickly after a period of inactivity. To set the auto-Lock interval, launch the Settings app, tap on General and then Auto-Lock and set the auto-lock interval to either 30 seconds, 1, 2, 3, 4 or 5 minutes.
          • You’re probably aware that using Wi-Fi drains iPhone’s battery, but perhaps you didn’t know that one of the most intensive processes that iPhone’s Wi-Fi chip has to do is search for available network. So if this happens in regular intervals, it’s going to have a noticeable impact on your battery. To disable this feature, launch the Settings app, tap on Wi-Fi, and tap on the On/Off toggle for Ask to Join Networks to disable it. Please note that by disabling this feature, your iPhone will join known Wi-Fi networks automatically, but you will have to manually select a network if no known networks are available. Note: It is disabled by default.
          • Dimming the screen helps to extend battery life. You can either lower the default screen brightness based on your preference or turn on Auto-Brightness to allow the screen to adjust its brightness based on current lighting conditions. Launch the Settings app, scroll down and tap on Brightness & Wallpaper and set Auto-Brightness to On. Note: Apple enables it by default.
          • Turn off Location services for the following System System services: Diagnostics & Usage, Setting Time Zone, Location Based iAds (Settings -> Privacy -> Location Services -> System Services).

        • 5. Location Services

          When we install apps, they prompt us to give them access to various things such location etc., and we tend to blindly say yes. However, apps using location services can have a major impact on battery life. So you may want to review which apps should have access to your device’s location. The best way to approach this is to first disable location services for all the app. You can disable location services via the Settings app and navigate to Privacy > Location Services. After you’ve disabled location services for all apps, you identify which apps such as navigation apps should use location services and enabled them individually.

          Use Location Only While Using the app

          In iOS, you can allow apps to use Location Services only while using the app, so the apps don’t use it all the time. This can be useful for apps like the App Store, which don’t need to be using location services all the time.
          You can see which applications have recently used location services by going to Settings > Privacy > Location Services. Apps that recently used your location have a purple compass-like indicator next them. Tap on the app, you should see the While Using the App, tap on it if you want the app to use location services only while using the app. This will ensure that the app will access your location only when it or one of its features are visible on the screen. As you can see below, iOS also tells you the App Store app is using location services to “find relevant apps nearby”.   Developers need to add support for this feature, so you may not find this option for all apps. If you’ve accidentally disabled location services for an app that needs to use it, don’t worry, it will prompt you to give access to Location Services when you launch it. I would strongly recommend change the setting to While Using the App for the Facebook app to prevent it from draining battery life.

          6. Place your iPhone Facedown

          iOS includes a new facedown detection feature, which makes use of the ambient light sensor to ensure the display doesn’t light up when you receive a Notification when you place the iPhone facedown. The feature along with other refinements helps in improving battery life by an additional hour as it turns off the display when not in use. So when you place your iPhone on the table, you should place it facedown to conserve battery life. Please note the Facedown Detection feature is available only on iPhone 5s or later devices.

          7. Check Cell Signal

          If you live or work in an area that has poor or no LTE coverage or your carrier doesn’t offer LTE yet, then you should consider switching to 3G to prevent the LTE radio from draining battery life unnecessarily. To switch to 3G, navigate to Settings -> General -> Cellular/Mobile -> Enable LTE/Enable 4G and tap on the Off option.

          8. Use Low Power Mode

          If your device is running low on battery, and you still have some time to get to a power source, then you could enable the all-new Low Power mode by going to Settings > Battery and tapping on the toggle. Low Power Mode temporarily reduces power consumption by turning off or reducing mail fetch, background app refresh, automatic downloads, and some visual effects. Apple states that Low Power Mode mode can extend battery life by an additional 3 hours.  You will also get a prompt to enable Low Power Mode when you hit 20% battery remaining, and will automatically disable it when battery remaining crosses 80%.


          9 Troubleshooting

          Restart/Reset Your iPhone

          Hold down the Sleep/Wake button and the Home button at the same time for at least ten seconds, until the Apple logo appears.

          Resetting Network Settings 

          Reset network settings by tapping Settings -> General -> Reset -> Reset Network Settings. This will reset all network settings, including passwords, VPN, and APN settings.

          Battery Maintenance

          Apple advices users to go through at least one charge cycle per month (charging the battery to 100% and then completely running it down). So if you haven’t done it already, it may be a good time to do it. Power cycling your device helps in recalibrating the battery indicator more accurately.

          10. Restore iPhone as New

          This is not ideal but the last resort. If you’ve setup your iPhone by restoring from backup then the battery life problems could be due to some issue with the backup. Try to restore your iPhone (Settings -> General -> Reset -> Erase All Content And Settings) and set it up as a new iPhone (not from the backup). But before you erase all the contents and settings, take a backup of your iPhone using iTunes or iCloud, or selectively take a backup of your photos and videos using Dropbox or Google+.
          We’ve seen quite a few comments from readers who have found that the battery life is better after setting up the device as a new iPhone/iPad/iPod touch.
          Did you face battery life problems after upgrading to iOS 10? Did any of these tips help? Let us know in the comments.
          Like this post? Share it!