iPhone & iPad Apps for the Blind &VisuallyImpaired

Showing posts with label iPhone. Show all posts

Friday, October 27, 2017

Set up Apple Watch using VoiceOver

Set up Apple Watch using VoiceOver


  1. IfApple Watch isn’t on, turn it on by holding down the side button (below the Digital Crown).
  2. On Apple Watch, turn on VoiceOver by triple-clicking the Digital Crown.
  3. Swipe right or left on the display to choose a language, then double-tap to select it.
  4. Swipe right to highlight the Start Pairing button, then double-tap.
  5. On iPhone, turn on VoiceOver by going to Settings > General > Accessibility > VoiceOver.
  6. To open the Apple Watch app, go to the iPhone Home screen, swipe right to select the Apple Watch app, then double-tap. 
  7. To get iPhone ready to pair, swipe right to select the Start Pairing button, then double-tap.
    The “Hold Apple Watch up to the Camera” screen appears.
  8. To try automatic pairing, point the iPhone camera at the watch from about 6 inches away.
    When you hear the pairing confirmation, you can skip to step 14. If you have difficulty, you can try manual pairing, steps 9 through 13.
  9. Swipe right to select the Pair Apple Watch Manually button, then double-tap.
  10. On Apple Watch, find your Apple Watch ID: swipe right to the Info About Pairing Apple Watch Manually button, then double-tap. Swipe right once to hear the unique identifier for your Apple Watch—it’ll be something like “Apple Watch 52345”.
  11. On iPhone, select your Apple Watch: swipe right until you hear the same Apple Watch identifier that you just heard on Apple Watch, then double-tap.
  12. To get your pairing code, on Apple Watch, swipe right until you hear the six-digit pairing code.
  13. Enter the pairing code from Apple Watch on iPhone using the keyboard.
    When pairing succeeds, you hear “Your Apple Watch is paired.” If pairing fails, tap to respond to the alerts, then Apple Watch and the Apple Watch app on iPhone reset so you can try again.
  14. When pairing is complete, on iPhone, swipe right to the Set Up Apple Watch button, then double-tap.
  15. To choose your wrist preference, swipe right on the Wrist Preference screen to select Left or Right, then double-tap.
  16. Review the terms and conditions, swipe right on the Terms and Conditions screen to select Agree, then double-tap. Select and double-tap Agree in the alert that appears.
  17. To enter the password for your Apple ID, swipe right to the Enter Password button, double-tap, then enter the password for the Apple ID you use on your iPhone. Then double-tap the Return key in the lower-right corner of the keyboard.
  18. To choose a Location Services option, swipe to your choice, then double-tap.
  19. To choose a Siri option, swipe to your choice, then double-tap.
  20. To create an Apple Watch passcode, swipe right on the Passcode screen to select Create a Passcode, then double-tap. On Apple Watch, enter a four-digit passcode of your choice, then reenter to confirm. Swipe, tap, or drag your finger around the display to select a number, then double-tap.
  21. On Apple Watch, choose whether to unlock Apple Watch when you unlock iPhone.
  22. To choose whether to install additional apps on Apple Watch, swipe to highlight Install All or Choose Later on iPhone, then double-tap.
    Apple Watch syncs with iPhone. This takes a few moments—swipe to Sync Progress on iPhone to hear progress. When you hear “sync complete” Apple Watch is ready to use, displaying the watch face. Swipe left or right to explore watch face features. For information about using VoiceOver with Apple Watch, see VoiceOver.

Thursday, August 24, 2017

How to search for posts in a group on Facebook App


To search for posts in a group:
  • Go to a group and tap Search below the cover photo.
  • Enter names or keywords that appear in either the post or the comments of the post you're searching for.

Once you have hit enter. Some suggestions will come up. Please note that they won't be all for that particular group but there will be a lot better. It's almost like a general search through Facebook. But it's better than nothing.

3E28EADA-0440-48A2-8001-18B0B8967D32-1-2048x1536-oriented.png

Saturday, August 12, 2017

Here is my review of my new BumpKase by NutKase.com


Hello my name is Chelsea and I want to tell you about my New iPad case called BumpKase
 by NutKase.com


Being a visually impaired person I have had a few issues with judging exactly if I have placed an item on a bed, counter or dresser. I have had a few times where I have missed the mark. And was extremely concerned if I have damaged what I have dropped. 

  I have been looking for a durable case for my iPad and  I have found the one that will give me that protection I want.

I have been using his case for about one week and it is the best drop proof case ever to protect my iPad! It's excellent quality with sleek design & it's made of rugged TPU and has double protected corners so if it drops it is safe! Plus it has a unique hand strap which allows me to hold it in one hand, & it comes in great colours! You will love it! Connecting headphones & plugging it in to charge is super easy, the ports are clearly delineated and very easy to use. It has a magnetic cover for sleep wake mode, and folds nicely into standing position & landscape mode. 
Another nice feature is that there is a clear pocket for a card with your name/phone number/address and email address. This will be beneficial for people knowing who the device belongs to.

 I know at times that money is extremely tight. And when you purchase an item you don't always plan on purchasing accessories and a mediately. But when you purchase a expensive I am such as an iPad it is extremely important to consider purchasing a case to protect your investment.  

So if you have an iPad or considering getting one I would extremely recommend checking out this company. They also have a case for laptops.


Friday, August 4, 2017

Labeling your Photos or Videos on an iOS Device using Voice Over


Labeling your Photos or Videos on an iOS Device using Voice Over In this tutorial, I show you how to label your photos on your iOS device. This is a hidden feature that is very 

handy. Feel free to comment below for any questions you may have.

Tuesday, August 1, 2017

Microsoft Seeing AI app Helps Blind People ‘See’ The World With AI

Image result for Microsoft Seeing AI app
Microsoft Seeing AI app  Helps Blind People ‘See’ The World With AI 

 A new app for iPhone users describes objects and reads text in the world using the phone's cameraGet More Ideas https://youtu.be/R2mC-NUAmMk

Image result for Microsoft Seeing AI app


Wednesday, May 10, 2017

How toFind Lost Apple AirPods

IMG_1247.JPG
The feature lives inside Apple’s Find my iPhone app, which allows users to locate their missing iOS devices on a Map via iCloud and a standalone iOS app. But since the AirPods rely on Bluetooth connectivity, it will only be able to locate the AirPods if they are in range of your other Apple devices. So, if you happen to lose one and don’t realize until after, you’d have to walk back in range in order to get a hit on the map. With Bluetooth, you can potentially get up to 5-10 meters of range.

The app will also allow you to play a sound from the AirPods that will help you locate one that is out of sight, which will probably be much more useful than the map feature that only gives you a very general location if in range. You can disable the sound for one AirPod, which can be handy if you only lose one and not the other.
Apple warns to make sure they aren’t in your ears when activating the sound, which has to be quite a bit louder than comfortable listening levels in order to work to help you locate a missing AirPod. The sound does, however, gradually get louder, which helps prevent hurting your ears.

IMG_1248.JPG
 Step one
 login to your find my iPhone app on your iPhone, iPad  or you can login from your Mac using iCloud.

Step 2 
Select your your Apple AirPods from the list of devices.

Step 3
Tap on actions. Then tap on play sound. The sound will gradually get louder. Once you find it hit pause. And then you can close out whatever you using to find it.


Friday, March 24, 2017

Use Continuity to connect your Mac, iPhone, iPad, iPod touch, andAppleWatch

All your devices. One seamless experience.

Start an email on your iPhone and finish it on iPad. Or copy images, video, and text from your iPad, then paste to your nearby Mac. You can even use AirDrop to share files wirelessly — and instantly — between devices.
Each of these features, together known as Continuity, allow your devices to work together so that you can do more. Make and receive phone calls without picking up your iPhone. Start an email, edit a document, or surf the web on one device, then pick up where you left off on another. Unlock your Mac without typing a password. Even activate your iPhone hotspot without taking your iPhone from your pocket or bag.
With Handoff, you can start work on one device, then switch to another nearby device and pick up where you left off.

Set up Handoff
Use Handoff with any Mac, iPhone, iPad, iPod touch, Apple Watch that meets the Continuity system requirements. Handoff works when your devices are near each other and set up as follows:
  • Each device is signed in to iCloud with the same Apple ID.
  • To see the Apple ID used by Apple Watch, open the Apple Watch app on your iPhone, then go to General > Apple ID.
  • Each device has Bluetooth turned on.
  • Each Mac, iPhone, iPad, or iPod touch has Wi-Fi turned on.
  • Each device has Handoff turned on:
    • On Mac, choose Apple menu () > System Preferences, then click General. Select “Allow Handoff between this Mac and your iCloud devices.”
    • On iPhone, iPad, or iPod touch, go to Settings > General > Handoff, then turn on Handoff.
    • On Apple Watch, open the Apple Watch app on your iPhone, then tap General and turn on Enable Handoff.
    • Apple Watch supports handing off from watch to iPhone only.
Use Handoff
  1. On one of your devices, open an app that works with Handoff.
  2. Apps that work with Handoff include Mail, Maps, Safari, Reminders, Calendar, Contacts, Pages, Numbers, Keynote, and numerous third-party apps.
  3. Use the app to start a task, such as writing an email or document.
  4. If switching to your Mac, click the app's icon in the Dock:
If switching to your iPhone, iPad, or iPod touch, use either of these steps:

If you're on the Lock screen, swipe up from the bottom-left edge of the screen, where you see the app’s icon 
If you're not on the Lock screen, double-click the Home button, then tap the app banner at the bottom of the multitasking screen.

With Universal Clipboard, you can copy text, images, photos, and video on one Apple device, then paste the content on another Apple device.

 Set up And Use Universal Clipboard.
  • On one device, copy the text, image, or video as you normally would. That content is automatically added to the clipboard of your other nearby device. It remains there briefly, or until you replace it by copying something else on either device. To learn more go to.

With the iPhone Cellular Calls feature, you can make and receive calls from your Mac, iPad, or iPod touch when those devices are on the same network as your iPhone.

Set up iPhone Cellular Calls
Use iPhone Cellular Calls with any Mac, iPhone, iPad, or iPod touch that meets the Continuity system requirements. It works when your devices are near each other and set up as follows:
  • Each device is signed in to iCloud with the same Apple ID.
  • Each device is signed in to FaceTime with the same Apple ID.
  • Each device has Wi-Fi turned on.
  • Each device is connected to the same network using Wi-Fi or Ethernet.
  • On iPhone, go to Settings > Phone > Calls on Other Devices, then turn on Allow Calls on Other Devices.
  • On iPad or iPod touch, go to Settings > FaceTime, then turn on Calls from iPhone.
  • On Mac, open the FaceTime app, then choose FaceTime > Preferences. Click Settings, then select Calls From iPhone.
If your carrier supports Wi-Fi calling on other devices, you can set up those devices to make and receive calls even when your iPhone isn't turned on or nearby.

Use iPhone Cellular Calls
Make a call on your iPad or iPod touch
  • Tap a phone number in Contacts, Calendar, Safari, or other app that automatically detects such data.
  • Or open the FaceTime app and enter the phone number in the search field. Tap the phone number in the search result, then tap Call.
Make a call on your Mac
  • Move the pointer over any phone number in Contacts, Calendar, Safari, or other app that automatically detects such data. Click the arrow in the box that outlines the phone number, then choose Call [phone number] Using iPhone.
  • Or open the FaceTime app and enter a phone number in the search field. Control-click the phone number in the search result, then choose the phone number from the pop-up menu.
Answer a call
  • On iPad or iPod touch, slide to answer the call.
  • On Mac, a notification appears when someone calls your iPhone. From there you can answer the call, send it to voicemail, or send the caller a message.
To stop getting calls at one of your devices, just turn off the Calls from iPhone setting on that device. See the setup section above for details.
If you have an iPhone, the text messages that you send and receive on your iPhone can appear on your Mac, iPad, and iPod touch as well. You can then continue the conversation from whichever device is closest to you.
Set up SMS and MMS messaging
Use this feature with any Mac, iPhone, iPad, or iPod touch that meets the Continuity system requirements. Make sure that your devices are set up as follows:
  • Each device is signed in to iCloud with the same Apple ID.
  • On iPhone, go to Settings > Messages > Send & Receive. Make sure that the Apple ID at the top of the screen is the same Apple ID that you're using for iMessage on your other devices. Add a check to your phone number and email address, so that you can be reached by iMessage at both. Do the same on your iPad or iPod touch.
  • On iPhone, go to Settings > Messages > Text Message Forwarding, then choose which devices to allow to send and receive text messages from this iPhone. If you're not using two-factor authentication for your Apple ID, a verification code appears on each of your other devices: enter that code on your iPhone.
  • On Mac, open Messages, then choose Messages > Preferences. Click Accounts, then select your iMessage account. Make sure that the Apple ID shown here is the same Apple ID that you're using on your other devices. Add a check to your phone number and email address.
Use SMS and MMS messaging
To use this feature, just start conversations as normal in the Messages app on any of your devices. You can also start a conversation by clicking a phone number in Safari, Contacts, Calendar, or other apps that detect phone numbers. All of your incoming and outgoing messages appear on all of your devices.
With Instant Hotspot, the Personal Hotspot on your iPhone or iPad (Wi-Fi + Cellular) can provide Internet access to a Mac, iPhone, iPad, or iPod touch without requiring you to enter the password on those devices.
Set up Instant Hotspot
Use Instant Hotspot with any Mac, iPhone, iPad, or iPod touch that meets the Continuity system requirements. It works when your devices are near each other and set up as follows:
  • Your iPhone or iPad (Wi-Fi + Cellular) has Personal Hotspot turned on in Settings > Cellular > Personal Hotspot.
  • Your device must have an activated carrier plan providing Personal Hotspot service.
  • Each device is signed in to iCloud with the same Apple ID.
  • Each device has Bluetooth turned on.
  • Each device has Wi-Fi turned on.
Use Instant Hotspot
To connect to your Personal Hotspot:
  • On Mac, use the Wi-Fi status menu .
  • in the menu bar to choose the name of the iPhone or iPad providing your Personal Hotspot 

On iPad, iPod touch, or even another iPhone, go to Settings > Wi-Fi, then tap the name of the iPhone or iPad providing your Personal Hotspot 

If you're asked for a password when connecting, make sure that your devices are set up as described above. The Wi-Fi status icon  in the menu bar shows the Personal Hotspot icon 

 as long as your device remains connected to your Personal Hotspot.
Set up and use Auto Unlock
Auto Unlock gives you instant access to your Mac when wearing your Apple Watch. Just wake up your Mac and you’re ready to go—without typing a password. Learn how.


Saturday, December 24, 2016

Keep your notes secure with password-protection

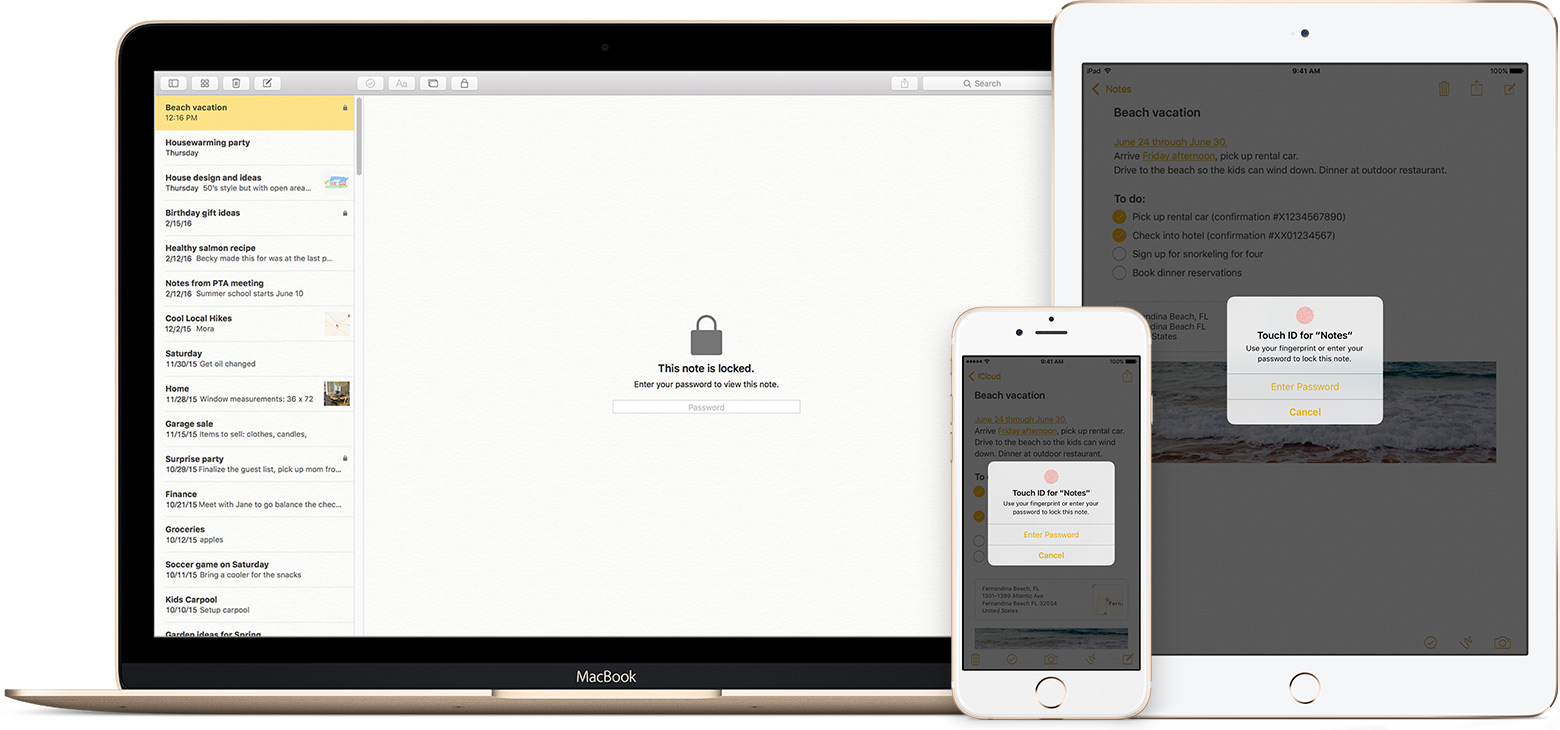
You can secure the notes that contain your most personal data—such as financial details, medical info, or website logins—with a password or fingerprint.

The Notes app lets you lock any note that you want to keep private from anyone else that might use your device. Notes uses a single password for all of the notes that you want to protect, on all of your devices. And if you have an iPhone or iPad with Touch ID, you can use your fingerprint to open your locked notes.

Before you begin

Set up your notes password

Before you can lock your notes, create a password that you can easily remember. If you're concerned about forgetting your password, make sure that you give yourself a password hint and that you set up Touch ID. If you forget your password, Apple can't help you reset it.
If you access your iCloud notes on more than one Apple device, you'll use the same notes password to lock and unlock all of them.

On your iPhone, iPad, or iPod touch

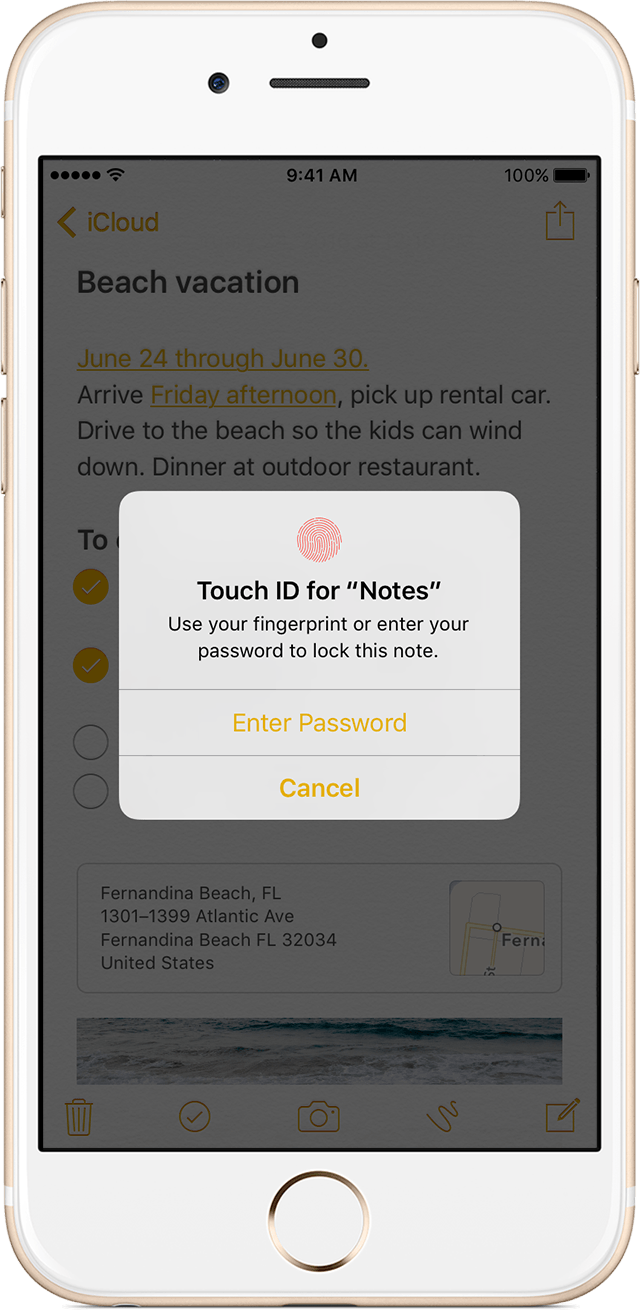
You can create a password in your device Settings or directly in the Notes app. Then you can turn on Use Touch ID on your iPhone or iPad, so that you can use your fingerprint to unlock your protected notes.

Create a password in Settings

  1. Go to Settings > Notes.
  2. Tap Password.
  3. Enter a password, then give yourself a password hint.
  4. Tap Done.

Create a password in Notes

  1. Open a note that you want to lock.
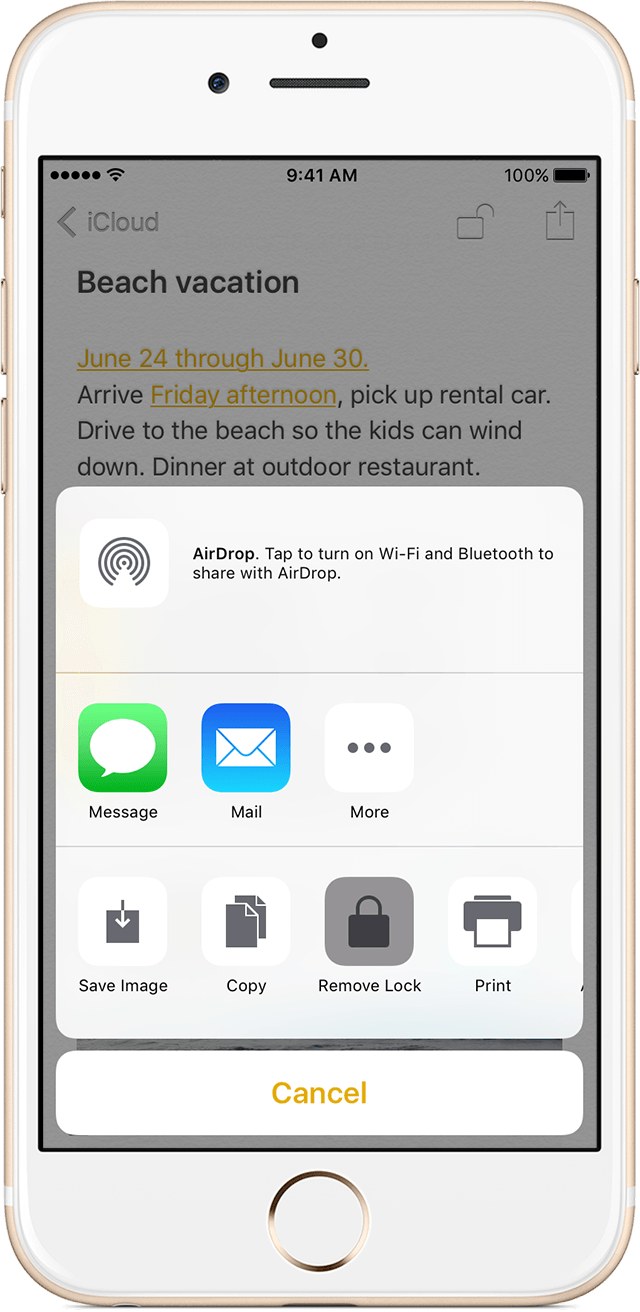
  2. Tap Share icon > Lock Note.
  3. Enter a password, then give yourself a password hint.
  4. Tap Done.

On your Mac

You can create a password on your Mac directly in the Notes app. In the menu bar, click Notes > Set Password. Enter a password, then give yourself a password hint and click Done.

Use Notes password-protection

Whether your note has an image, sketch, map, URL, or list of important information, it's simple to keep it safe with password-protection. And when you need to access your secure notes, you can tell which ones are locked directly from the Notes list. Just look for the  next to the note. Until you enter your password or use Touch ID, you only see the title and the last date that it was edited.
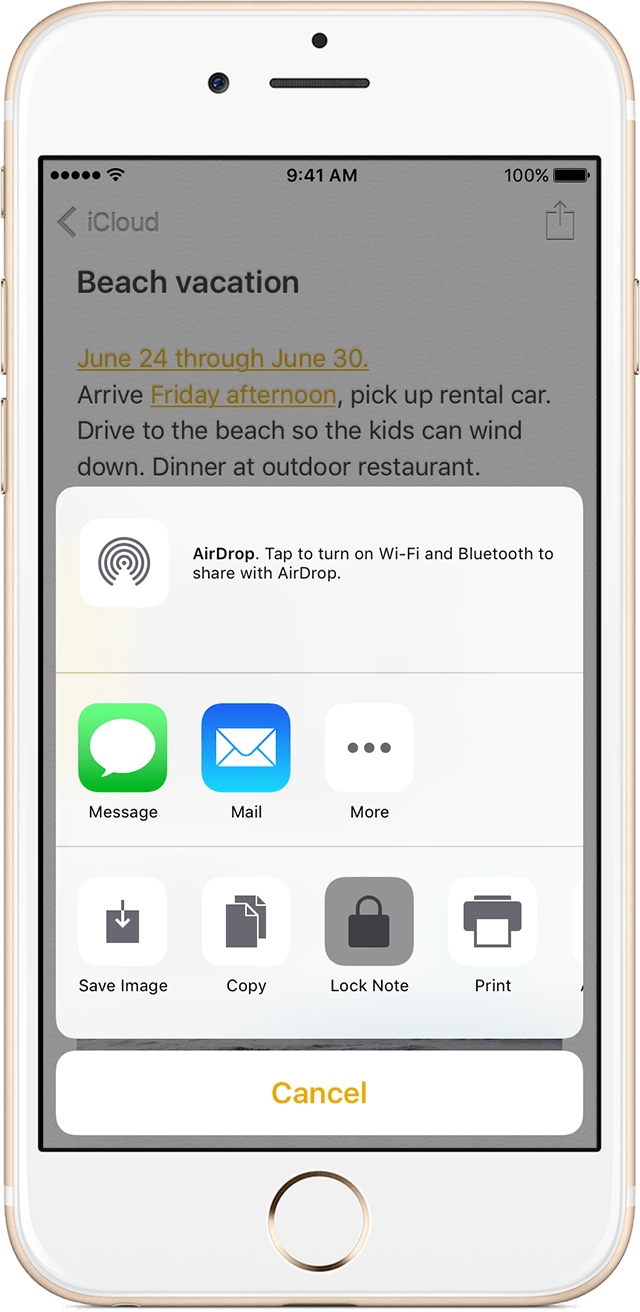
You can't password-protect notes that you share with someone else. If you want to stop sharing a note, open , then tap or click Stop Sharing.
     

Lock a note

On your iPhone, iPad, or iPod touch:
  1. Open the note that you want to lock.
  2. Tap Share icon .
  3. Choose Lock Note.
After you lock your note, it stays open and you'll see unlocked notes icon at the top of the screen. You can hide the note's contents when you tap .
On your Mac:
  1. Open the note that you want to lock.
  2. Click lock notes icon.
  3. Choose Lock Note.
You can only lock notes on your device and notes in iCloud. You can't lock notes that have PDFs, audio, video, Keynote, Pages, Numbers documents, or notes that use IMAP to sync (like Yahoo!, Gmail, and Hotmail).
     

Open a locked note

On your iPhone, iPad, or iPod touch:
  1. Tap the locked note.
  2. Tap View Note.
  3. Enter your password or use Touch ID.
On your Mac and iCloud.com:
  1. Click the locked note.
  2. Enter your password.
Your locked notes stay open for up to three minutes, making it easy for you to jump to another note, copy and paste information from other apps, and more. If you close the Notes app or your device goes to sleep, the note locks again.
     

Remove a lock

On your iPhone, iPad, or iPod touch:
  1. Tap the locked note.
  2. Enter your password or use Touch ID.
  3. Tap Share icon.   
  4. Choose Remove Lock.
On your Mac:
  1. Click the locked note.
  2. Enter your password.
  3. Click .   
  4. Choose Remove Lock.
When you remove a lock from a note, it's removed on all of the devices that you're signed in to with the same Apple ID.

Change your password

On your iPhone, iPad, or iPod touch:
  1. Go to Settings > Notes > Password.
  2. Tap Change Password.
  3. Enter your old password, then enter a new password and password hint.
On your Mac:
  1. Open Notes.
  2. In the menu bar, choose Notes > Change Password.
  3. Enter your old password, then enter a new password and password hint.
  4. Click Change Password.

If you forgot your notes password

You can unlock a note only when you enter the password that it's locked with. If you forgot your password, Apple can't help you regain access to your locked notes.
You can reset your password, but this won’t give you access to your old notes. It will, however, let you password protect any notes that you create from that point forward with the new password. This could lead to you having multiple notes with different passwords.
If you have multiple passwords, you can't tell which password you should use when you look at your notes in the Notes list. When you open a note locked by your old password but enter your current password, you'll see an alert that you entered the wrong password with a hint for your old one. If you then enter the correct old password, you get the option to update that note's password to your current one.

Reset your notes password

When you reset your Notes password, it doesn't delete or change the password of your notes that are already locked. If you have a note that uses an old password, you can update it to the new password when you enter the old password, remove the old password, then apply your new password to the note.
On your iPhone, iPad, or iPod touch:
  1. Go to Settings > Notes > Password.
  2. Tap Reset Notes Password.
  3. Enter your Apple ID password.
  4. Tap Reset Notes Password again.
  5. Enter your new password and password hint.
On your Mac:
  1. Open Notes.
  2. In the menu bar, click Notes > Reset Password > OK.
  3. Enter your Apple ID password.
  4. Click Reset Password.
  5. Enter your new password and password hint.