iPhone & iPad Apps for the Blind &VisuallyImpaired

Showing posts with label Accessibility. Show all posts

Friday, October 27, 2017

Set up Apple Watch using VoiceOver

Set up Apple Watch using VoiceOver


  1. IfApple Watch isn’t on, turn it on by holding down the side button (below the Digital Crown).
  2. On Apple Watch, turn on VoiceOver by triple-clicking the Digital Crown.
  3. Swipe right or left on the display to choose a language, then double-tap to select it.
  4. Swipe right to highlight the Start Pairing button, then double-tap.
  5. On iPhone, turn on VoiceOver by going to Settings > General > Accessibility > VoiceOver.
  6. To open the Apple Watch app, go to the iPhone Home screen, swipe right to select the Apple Watch app, then double-tap. 
  7. To get iPhone ready to pair, swipe right to select the Start Pairing button, then double-tap.
    The “Hold Apple Watch up to the Camera” screen appears.
  8. To try automatic pairing, point the iPhone camera at the watch from about 6 inches away.
    When you hear the pairing confirmation, you can skip to step 14. If you have difficulty, you can try manual pairing, steps 9 through 13.
  9. Swipe right to select the Pair Apple Watch Manually button, then double-tap.
  10. On Apple Watch, find your Apple Watch ID: swipe right to the Info About Pairing Apple Watch Manually button, then double-tap. Swipe right once to hear the unique identifier for your Apple Watch—it’ll be something like “Apple Watch 52345”.
  11. On iPhone, select your Apple Watch: swipe right until you hear the same Apple Watch identifier that you just heard on Apple Watch, then double-tap.
  12. To get your pairing code, on Apple Watch, swipe right until you hear the six-digit pairing code.
  13. Enter the pairing code from Apple Watch on iPhone using the keyboard.
    When pairing succeeds, you hear “Your Apple Watch is paired.” If pairing fails, tap to respond to the alerts, then Apple Watch and the Apple Watch app on iPhone reset so you can try again.
  14. When pairing is complete, on iPhone, swipe right to the Set Up Apple Watch button, then double-tap.
  15. To choose your wrist preference, swipe right on the Wrist Preference screen to select Left or Right, then double-tap.
  16. Review the terms and conditions, swipe right on the Terms and Conditions screen to select Agree, then double-tap. Select and double-tap Agree in the alert that appears.
  17. To enter the password for your Apple ID, swipe right to the Enter Password button, double-tap, then enter the password for the Apple ID you use on your iPhone. Then double-tap the Return key in the lower-right corner of the keyboard.
  18. To choose a Location Services option, swipe to your choice, then double-tap.
  19. To choose a Siri option, swipe to your choice, then double-tap.
  20. To create an Apple Watch passcode, swipe right on the Passcode screen to select Create a Passcode, then double-tap. On Apple Watch, enter a four-digit passcode of your choice, then reenter to confirm. Swipe, tap, or drag your finger around the display to select a number, then double-tap.
  21. On Apple Watch, choose whether to unlock Apple Watch when you unlock iPhone.
  22. To choose whether to install additional apps on Apple Watch, swipe to highlight Install All or Choose Later on iPhone, then double-tap.
    Apple Watch syncs with iPhone. This takes a few moments—swipe to Sync Progress on iPhone to hear progress. When you hear “sync complete” Apple Watch is ready to use, displaying the watch face. Swipe left or right to explore watch face features. For information about using VoiceOver with Apple Watch, see VoiceOver.

Friday, August 4, 2017

Have you heard of a company called NutKase.com ? They make a very interesting looking iPad case.

I was contacted by a nice lady by the name of Amy Lentini she is a owner of a family owned business called NutKase.com.  


They are a small family run business . who have designed a interesting iPad case which protects your product if it is dropped as well as having a unique elasticated strap on the back which is used to hold your iPad conveniently without the fear of dropping it. This looks like a very intriguing product. !

 I will be receiving it in the mail soon. After I tried out for a little while I will do a  in depth review.

 I am going to provide a link to their website here. And some photos. Can't wait to try this out as a visually impaired person . So stay tune for my review of NutKase.com.

 you can also find them at.
 Instagra nutkase_tech


Labeling your Photos or Videos on an iOS Device using Voice Over


Labeling your Photos or Videos on an iOS Device using Voice Over In this tutorial, I show you how to label your photos on your iOS device. This is a hidden feature that is very 

handy. Feel free to comment below for any questions you may have.

Saturday, November 5, 2016

Be My Eyes - helping blind see app

Be My Eyes is an app that connects blind and visually impaired with sighted helpers from around the world via live video 

Wednesday, September 14, 2016

How to improve iOS 10 Battery Life

f you’ve upgraded your iPhone, iPad or iPod touch to iOS 10, and are facing battery life problems then check out the tips after the break to see if they help in fixing the problem.
iOS 10 comes with a number of new features such as major updates to the Messages app, new Home app, all-new Photos, Music and News apps Siri integration with some types of third-party apps, VoIP calls integration in the Phone app, and lots more. So it is possible that features such as  The problem with battery Life issues is that it is very subjective as it is based on your usage pattern, so it is difficult to pinpoint what exactly is causing a problem.  Note: I’ve noticed that people are quite cynical about such articles as most of them tell you to disable features. The aim of the article is not to tell you to disable features on your iPhone, but the purpose is to provide you information about the various settings that are available, so you can disable the features that you don’t use as it would help in extending your iPhone’s battery life.

Tips to Fix iOS 10 Battery Life Problems


1. Battery usage

The first step in fixing the battery problems is to understand battery usage. iOS gives you a breakdown of battery usage by apps. It even gives you the amount of time the app was used and the amount of time it was running in the background. You can use that information to identify the battery hogs.

    How to find battery usage


    • Launch the Settings app
    • Tap on Battery


    • 2. Push Email

      Push email can be a primary cause of battery drain on some devices. To identify if your email is Push or Fetch, launch the Settings app, and navigate to Mails, Contacts and Calendars > Fetch New Data. You need to check if the email account has been set as Push, Fetch or Manual.


      Push ensures that you get an instant notification when you get a new email, whereas Fetch will look for new data 15 minutes, every 30 minutes, hourly or when you launch the Mail app (manually). You may want to disable Push email temporarily for your email accounts to see if it improves battery life.
      Alternatively, if you use multiple email accounts then you may want to disable Push for email accounts where you don’t need to get an instant notification for new email, and switch to Fetch. The higher the fetch interval, the better it is for battery life, so you can set it appropriately based on the importance of the email account.

      3. Background App Refresh

      iOS’ smart multitasking feature lets apps fetch content in the background. Although Apple has made a lot of optimizations to ensure that battery consumption is minimal, it’s possible that poorly developed app can drain battery life due to this feature. To disable Background App Refresh go to Settings > General > Background App Refresh > and turn it off for apps that don’t absolutely need to be updated all the time. Background App Refresh is a great feature, but you don’t need it for every app. I would strongly recommend turning it off for the Facebook app as it is known to drain battery life.


      4. General Tips

      Please note that the tips under section are to highlight areas where you could disable things that are not applicable to you so you can maximize battery life. We are not recommending or advising you to disable features just for battery life, as then there would be no point in using smartphones like the iPhone.

      Remove Unwanted Widgets

      Swipe right from the edge of the Home screen or Lock screen to open Today View. You can add widgets to the Today View to get timely information from your favorite apps, however, they can drain battery life since they fetch data in the background to show up-to-date information. You should review the list and remove the widgets that you don’t want to ensure they don’t consume battery life unnecessarily as some of them could be using Location services.
      Swipe down from the top edge of the screen to access Notification Center. Then swipe to the left to access the Widget tab, scroll down and tap on Edit button. Tap on the red button to remove the widget from the Notification Center.

      Turn off Dynamic Wallpapers

      Dynamic wallpapers bring subtle animations to the Home and the Lock screen. Unfortunately, the animations take up CPU cycles and consume more battery. So if you have set a dynamic wallpaper, and you’re having battery issues, go to Settings > Wallpaper > Choose Wallpaper where you can go to either Stills or your set an image from your photo library as your wallpaper.

      Disable Motion Effects, Parallax

      Apple added a number of animations and physics-based effects to the interface in iOS 7 to help users understand the layered elements in the UI. Some of these effects even access gyroscopic data, which contributes further to battery drain. You can disable these motion effects by going to Settings > General > Accessibility > Reduce Motion and turn on the switch.

      Disable App Store’s Automatic Updates

      App Store automatic installs app updates in the background, but if you’re not too keen on updating all your apps, you can turn this off by going to Settings > iTunes and App Store > scroll down to the Automatic Downloads section and turn off the “Updates” switch. While you’re there, you can also tell iOS to not use cellular data for automatic downloads and iTunes Match streaming.

      Disable unwanted indexing in Spotlight search

      Spotlight searches a lot of types of content like Applications, Contacts, Music, Podcasts, Mails, Events etc., when you might use it only for contacts, applications, and music. So uncheck the type of content you don’t want to search by going to Settings > General > Spotlight Search.

      Turn off Push Notifications

      If you receive a lot of push notifications, your battery can take a hit, so make sure you turn off push for apps that you don’t frequently by navigating to Settings > Notifications > Scroll down to the Include section to see the list of apps and tap on any of them to turn notifications off.

      Other tips

      • If you don’t connect Bluetooth devices to your iPhone then turn it off (Settings -> General -> Bluetooth)
      • Set Auto-Lock interval so that your iPhone will turn off more quickly after a period of inactivity. To set the auto-Lock interval, launch the Settings app, tap on General and then Auto-Lock and set the auto-lock interval to either 30 seconds, 1, 2, 3, 4 or 5 minutes.
      • You’re probably aware that using Wi-Fi drains iPhone’s battery, but perhaps you didn’t know that one of the most intensive processes that iPhone’s Wi-Fi chip has to do is search for available network. So if this happens in regular intervals, it’s going to have a noticeable impact on your battery. To disable this feature, launch the Settings app, tap on Wi-Fi, and tap on the On/Off toggle for Ask to Join Networks to disable it. Please note that by disabling this feature, your iPhone will join known Wi-Fi networks automatically, but you will have to manually select a network if no known networks are available. Note: It is disabled by default.
      • Dimming the screen helps to extend battery life. You can either lower the default screen brightness based on your preference or turn on Auto-Brightness to allow the screen to adjust its brightness based on current lighting conditions. Launch the Settings app, scroll down and tap on Brightness & Wallpaper and set Auto-Brightness to On. Note: Apple enables it by default.
      • Turn off Location services for the following System System services: Diagnostics & Usage, Setting Time Zone, Location Based iAds (Settings -> Privacy -> Location Services -> System Services).

    • 5. Location Services

      When we install apps, they prompt us to give them access to various things such location etc., and we tend to blindly say yes. However, apps using location services can have a major impact on battery life. So you may want to review which apps should have access to your device’s location. The best way to approach this is to first disable location services for all the app. You can disable location services via the Settings app and navigate to Privacy > Location Services. After you’ve disabled location services for all apps, you identify which apps such as navigation apps should use location services and enabled them individually.

      Use Location Only While Using the app

      In iOS, you can allow apps to use Location Services only while using the app, so the apps don’t use it all the time. This can be useful for apps like the App Store, which don’t need to be using location services all the time.
      You can see which applications have recently used location services by going to Settings > Privacy > Location Services. Apps that recently used your location have a purple compass-like indicator next them. Tap on the app, you should see the While Using the App, tap on it if you want the app to use location services only while using the app. This will ensure that the app will access your location only when it or one of its features are visible on the screen. As you can see below, iOS also tells you the App Store app is using location services to “find relevant apps nearby”.   Developers need to add support for this feature, so you may not find this option for all apps. If you’ve accidentally disabled location services for an app that needs to use it, don’t worry, it will prompt you to give access to Location Services when you launch it. I would strongly recommend change the setting to While Using the App for the Facebook app to prevent it from draining battery life.

      6. Place your iPhone Facedown

      iOS includes a new facedown detection feature, which makes use of the ambient light sensor to ensure the display doesn’t light up when you receive a Notification when you place the iPhone facedown. The feature along with other refinements helps in improving battery life by an additional hour as it turns off the display when not in use. So when you place your iPhone on the table, you should place it facedown to conserve battery life. Please note the Facedown Detection feature is available only on iPhone 5s or later devices.

      7. Check Cell Signal

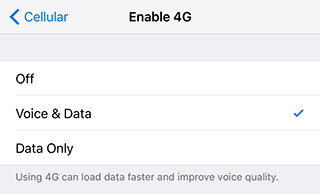
      If you live or work in an area that has poor or no LTE coverage or your carrier doesn’t offer LTE yet, then you should consider switching to 3G to prevent the LTE radio from draining battery life unnecessarily. To switch to 3G, navigate to Settings -> General -> Cellular/Mobile -> Enable LTE/Enable 4G and tap on the Off option.

      8. Use Low Power Mode

      If your device is running low on battery, and you still have some time to get to a power source, then you could enable the all-new Low Power mode by going to Settings > Battery and tapping on the toggle. Low Power Mode temporarily reduces power consumption by turning off or reducing mail fetch, background app refresh, automatic downloads, and some visual effects. Apple states that Low Power Mode mode can extend battery life by an additional 3 hours.  You will also get a prompt to enable Low Power Mode when you hit 20% battery remaining, and will automatically disable it when battery remaining crosses 80%.


      9 Troubleshooting

      Restart/Reset Your iPhone

      Hold down the Sleep/Wake button and the Home button at the same time for at least ten seconds, until the Apple logo appears.

      Resetting Network Settings 

      Reset network settings by tapping Settings -> General -> Reset -> Reset Network Settings. This will reset all network settings, including passwords, VPN, and APN settings.

      Battery Maintenance

      Apple advices users to go through at least one charge cycle per month (charging the battery to 100% and then completely running it down). So if you haven’t done it already, it may be a good time to do it. Power cycling your device helps in recalibrating the battery indicator more accurately.

      10. Restore iPhone as New

      This is not ideal but the last resort. If you’ve setup your iPhone by restoring from backup then the battery life problems could be due to some issue with the backup. Try to restore your iPhone (Settings -> General -> Reset -> Erase All Content And Settings) and set it up as a new iPhone (not from the backup). But before you erase all the contents and settings, take a backup of your iPhone using iTunes or iCloud, or selectively take a backup of your photos and videos using Dropbox or Google+.
      We’ve seen quite a few comments from readers who have found that the battery life is better after setting up the device as a new iPhone/iPad/iPod touch.
      Did you face battery life problems after upgrading to iOS 10? Did any of these tips help? Let us know in the comments.
      Like this post? Share it!

      How to improve iOS 10 Battery Life

      f you’ve upgraded your iPhone, iPad or iPod touch to iOS 10, and are facing battery life problems then check out the tips after the break to see if they help in fixing the problem.
      iOS 10 comes with a number of new features such as major updates to the Messages app, new Home app, all-new Photos, Music and News apps Siri integration with some types of third-party apps, VoIP calls integration in the Phone app, and lots more. So it is possible that features such as  The problem with battery Life issues is that it is very subjective as it is based on your usage pattern, so it is difficult to pinpoint what exactly is causing a problem.  Note: I’ve noticed that people are quite cynical about such articles as most of them tell you to disable features. The aim of the article is not to tell you to disable features on your iPhone, but the purpose is to provide you information about the various settings that are available, so you can disable the features that you don’t use as it would help in extending your iPhone’s battery life.

      Tips to Fix iOS 10 Battery Life Problems


      1. Battery usage

      The first step in fixing the battery problems is to understand battery usage. iOS gives you a breakdown of battery usage by apps. It even gives you the amount of time the app was used and the amount of time it was running in the background. You can use that information to identify the battery hogs.

        How to find battery usage


        • Launch the Settings app
        • Tap on Battery


        • 2. Push Email

          Push email can be a primary cause of battery drain on some devices. To identify if your email is Push or Fetch, launch the Settings app, and navigate to Mails, Contacts and Calendars > Fetch New Data. You need to check if the email account has been set as Push, Fetch or Manual.


          Push ensures that you get an instant notification when you get a new email, whereas Fetch will look for new data 15 minutes, every 30 minutes, hourly or when you launch the Mail app (manually). You may want to disable Push email temporarily for your email accounts to see if it improves battery life.
          Alternatively, if you use multiple email accounts then you may want to disable Push for email accounts where you don’t need to get an instant notification for new email, and switch to Fetch. The higher the fetch interval, the better it is for battery life, so you can set it appropriately based on the importance of the email account.

          3. Background App Refresh

          iOS’ smart multitasking feature lets apps fetch content in the background. Although Apple has made a lot of optimizations to ensure that battery consumption is minimal, it’s possible that poorly developed app can drain battery life due to this feature. To disable Background App Refresh go to Settings > General > Background App Refresh > and turn it off for apps that don’t absolutely need to be updated all the time. Background App Refresh is a great feature, but you don’t need it for every app. I would strongly recommend turning it off for the Facebook app as it is known to drain battery life.


          4. General Tips

          Please note that the tips under section are to highlight areas where you could disable things that are not applicable to you so you can maximize battery life. We are not recommending or advising you to disable features just for battery life, as then there would be no point in using smartphones like the iPhone.

          Remove Unwanted Widgets

          Swipe right from the edge of the Home screen or Lock screen to open Today View. You can add widgets to the Today View to get timely information from your favorite apps, however, they can drain battery life since they fetch data in the background to show up-to-date information. You should review the list and remove the widgets that you don’t want to ensure they don’t consume battery life unnecessarily as some of them could be using Location services.
          Swipe down from the top edge of the screen to access Notification Center. Then swipe to the left to access the Widget tab, scroll down and tap on Edit button. Tap on the red button to remove the widget from the Notification Center.

          Turn off Dynamic Wallpapers

          Dynamic wallpapers bring subtle animations to the Home and the Lock screen. Unfortunately, the animations take up CPU cycles and consume more battery. So if you have set a dynamic wallpaper, and you’re having battery issues, go to Settings > Wallpaper > Choose Wallpaper where you can go to either Stills or your set an image from your photo library as your wallpaper.

          Disable Motion Effects, Parallax

          Apple added a number of animations and physics-based effects to the interface in iOS 7 to help users understand the layered elements in the UI. Some of these effects even access gyroscopic data, which contributes further to battery drain. You can disable these motion effects by going to Settings > General > Accessibility > Reduce Motion and turn on the switch.

          Disable App Store’s Automatic Updates

          App Store automatic installs app updates in the background, but if you’re not too keen on updating all your apps, you can turn this off by going to Settings > iTunes and App Store > scroll down to the Automatic Downloads section and turn off the “Updates” switch. While you’re there, you can also tell iOS to not use cellular data for automatic downloads and iTunes Match streaming.

          Disable unwanted indexing in Spotlight search

          Spotlight searches a lot of types of content like Applications, Contacts, Music, Podcasts, Mails, Events etc., when you might use it only for contacts, applications, and music. So uncheck the type of content you don’t want to search by going to Settings > General > Spotlight Search.

          Turn off Push Notifications

          If you receive a lot of push notifications, your battery can take a hit, so make sure you turn off push for apps that you don’t frequently by navigating to Settings > Notifications > Scroll down to the Include section to see the list of apps and tap on any of them to turn notifications off.

          Other tips

          • If you don’t connect Bluetooth devices to your iPhone then turn it off (Settings -> General -> Bluetooth)
          • Set Auto-Lock interval so that your iPhone will turn off more quickly after a period of inactivity. To set the auto-Lock interval, launch the Settings app, tap on General and then Auto-Lock and set the auto-lock interval to either 30 seconds, 1, 2, 3, 4 or 5 minutes.
          • You’re probably aware that using Wi-Fi drains iPhone’s battery, but perhaps you didn’t know that one of the most intensive processes that iPhone’s Wi-Fi chip has to do is search for available network. So if this happens in regular intervals, it’s going to have a noticeable impact on your battery. To disable this feature, launch the Settings app, tap on Wi-Fi, and tap on the On/Off toggle for Ask to Join Networks to disable it. Please note that by disabling this feature, your iPhone will join known Wi-Fi networks automatically, but you will have to manually select a network if no known networks are available. Note: It is disabled by default.
          • Dimming the screen helps to extend battery life. You can either lower the default screen brightness based on your preference or turn on Auto-Brightness to allow the screen to adjust its brightness based on current lighting conditions. Launch the Settings app, scroll down and tap on Brightness & Wallpaper and set Auto-Brightness to On. Note: Apple enables it by default.
          • Turn off Location services for the following System System services: Diagnostics & Usage, Setting Time Zone, Location Based iAds (Settings -> Privacy -> Location Services -> System Services).

        • 5. Location Services

          When we install apps, they prompt us to give them access to various things such location etc., and we tend to blindly say yes. However, apps using location services can have a major impact on battery life. So you may want to review which apps should have access to your device’s location. The best way to approach this is to first disable location services for all the app. You can disable location services via the Settings app and navigate to Privacy > Location Services. After you’ve disabled location services for all apps, you identify which apps such as navigation apps should use location services and enabled them individually.

          Use Location Only While Using the app

          In iOS, you can allow apps to use Location Services only while using the app, so the apps don’t use it all the time. This can be useful for apps like the App Store, which don’t need to be using location services all the time.
          You can see which applications have recently used location services by going to Settings > Privacy > Location Services. Apps that recently used your location have a purple compass-like indicator next them. Tap on the app, you should see the While Using the App, tap on it if you want the app to use location services only while using the app. This will ensure that the app will access your location only when it or one of its features are visible on the screen. As you can see below, iOS also tells you the App Store app is using location services to “find relevant apps nearby”.   Developers need to add support for this feature, so you may not find this option for all apps. If you’ve accidentally disabled location services for an app that needs to use it, don’t worry, it will prompt you to give access to Location Services when you launch it. I would strongly recommend change the setting to While Using the App for the Facebook app to prevent it from draining battery life.

          6. Place your iPhone Facedown

          iOS includes a new facedown detection feature, which makes use of the ambient light sensor to ensure the display doesn’t light up when you receive a Notification when you place the iPhone facedown. The feature along with other refinements helps in improving battery life by an additional hour as it turns off the display when not in use. So when you place your iPhone on the table, you should place it facedown to conserve battery life. Please note the Facedown Detection feature is available only on iPhone 5s or later devices.

          7. Check Cell Signal

          If you live or work in an area that has poor or no LTE coverage or your carrier doesn’t offer LTE yet, then you should consider switching to 3G to prevent the LTE radio from draining battery life unnecessarily. To switch to 3G, navigate to Settings -> General -> Cellular/Mobile -> Enable LTE/Enable 4G and tap on the Off option.

          8. Use Low Power Mode

          If your device is running low on battery, and you still have some time to get to a power source, then you could enable the all-new Low Power mode by going to Settings > Battery and tapping on the toggle. Low Power Mode temporarily reduces power consumption by turning off or reducing mail fetch, background app refresh, automatic downloads, and some visual effects. Apple states that Low Power Mode mode can extend battery life by an additional 3 hours.  You will also get a prompt to enable Low Power Mode when you hit 20% battery remaining, and will automatically disable it when battery remaining crosses 80%.


          9 Troubleshooting

          Restart/Reset Your iPhone

          Hold down the Sleep/Wake button and the Home button at the same time for at least ten seconds, until the Apple logo appears.

          Resetting Network Settings 

          Reset network settings by tapping Settings -> General -> Reset -> Reset Network Settings. This will reset all network settings, including passwords, VPN, and APN settings.

          Battery Maintenance

          Apple advices users to go through at least one charge cycle per month (charging the battery to 100% and then completely running it down). So if you haven’t done it already, it may be a good time to do it. Power cycling your device helps in recalibrating the battery indicator more accurately.

          10. Restore iPhone as New

          This is not ideal but the last resort. If you’ve setup your iPhone by restoring from backup then the battery life problems could be due to some issue with the backup. Try to restore your iPhone (Settings -> General -> Reset -> Erase All Content And Settings) and set it up as a new iPhone (not from the backup). But before you erase all the contents and settings, take a backup of your iPhone using iTunes or iCloud, or selectively take a backup of your photos and videos using Dropbox or Google+.
          We’ve seen quite a few comments from readers who have found that the battery life is better after setting up the device as a new iPhone/iPad/iPod touch.
          Did you face battery life problems after upgrading to iOS 10? Did any of these tips help? Let us know in the comments.
          Like this post? Share it!