iPhone & iPad Apps for the Blind &VisuallyImpaired

Showing posts with label ipod. Show all posts

Saturday, December 24, 2016

Keep your notes secure with password-protection

You can secure the notes that contain your most personal data—such as financial details, medical info, or website logins—with a password or fingerprint.
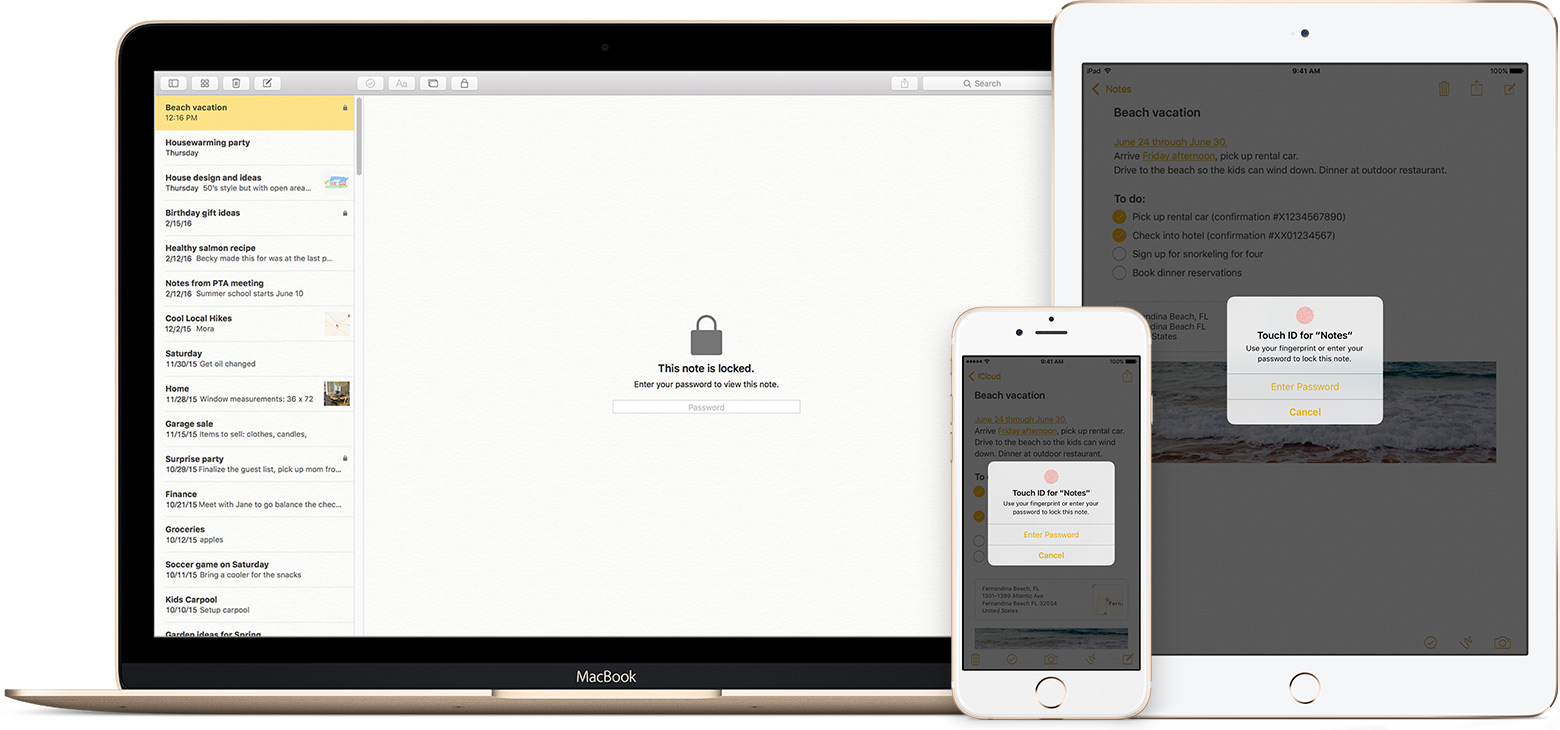
The Notes app lets you lock any note that you want to keep private from anyone else that might use your device. Notes uses a single password for all of the notes that you want to protect, on all of your devices. And if you have an iPhone or iPad with Touch ID, you can use your fingerprint to open your locked notes.

Before you begin

Set up your notes password

Before you can lock your notes, create a password that you can easily remember. If you're concerned about forgetting your password, make sure that you give yourself a password hint and that you set up Touch ID. If you forget your password, Apple can't help you reset it.
If you access your iCloud notes on more than one Apple device, you'll use the same notes password to lock and unlock all of them.

On your iPhone, iPad, or iPod touch

You can create a password in your device Settings or directly in the Notes app. Then you can turn on Use Touch ID on your iPhone or iPad, so that you can use your fingerprint to unlock your protected notes.

Create a password in Settings

  1. Go to Settings > Notes.
  2. Tap Password.
  3. Enter a password, then give yourself a password hint.
  4. Tap Done.

Create a password in Notes

  1. Open a note that you want to lock.
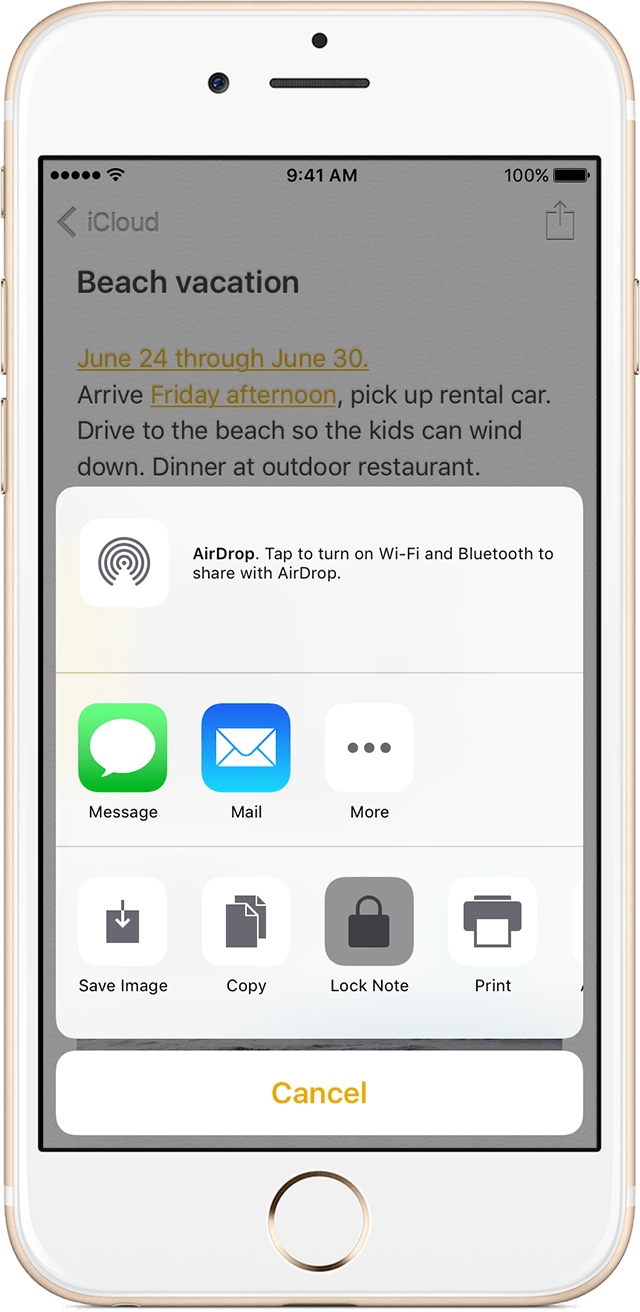
  2. Tap Share icon > Lock Note.
  3. Enter a password, then give yourself a password hint.
  4. Tap Done.

On your Mac

You can create a password on your Mac directly in the Notes app. In the menu bar, click Notes > Set Password. Enter a password, then give yourself a password hint and click Done.

Use Notes password-protection

Whether your note has an image, sketch, map, URL, or list of important information, it's simple to keep it safe with password-protection. And when you need to access your secure notes, you can tell which ones are locked directly from the Notes list. Just look for the  next to the note. Until you enter your password or use Touch ID, you only see the title and the last date that it was edited.
You can't password-protect notes that you share with someone else. If you want to stop sharing a note, open , then tap or click Stop Sharing.
     

Lock a note

On your iPhone, iPad, or iPod touch:
  1. Open the note that you want to lock.
  2. Tap Share icon .
  3. Choose Lock Note.
After you lock your note, it stays open and you'll see unlocked notes icon at the top of the screen. You can hide the note's contents when you tap .
On your Mac:
  1. Open the note that you want to lock.
  2. Click lock notes icon.
  3. Choose Lock Note.
You can only lock notes on your device and notes in iCloud. You can't lock notes that have PDFs, audio, video, Keynote, Pages, Numbers documents, or notes that use IMAP to sync (like Yahoo!, Gmail, and Hotmail).

     

Open a locked note

On your iPhone, iPad, or iPod touch:
  1. Tap the locked note.
  2. Tap View Note.
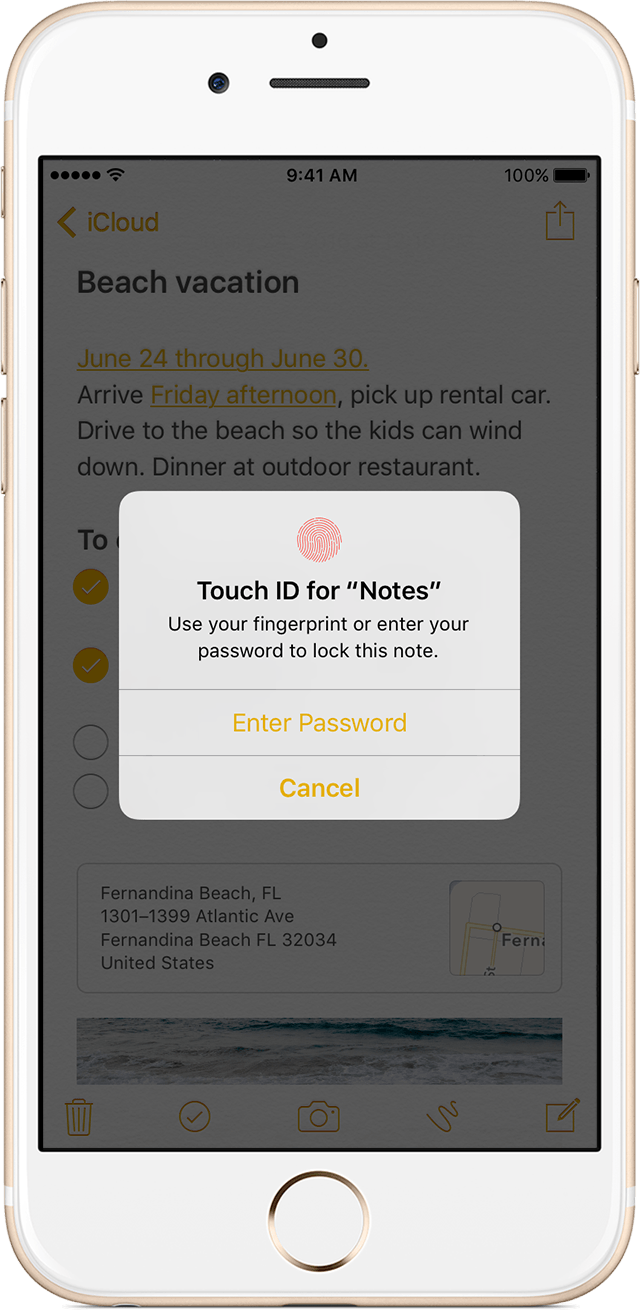
  3. Enter your password or use Touch ID.
On your Mac and iCloud.com:
  1. Click the locked note.
  2. Enter your password.
Your locked notes stay open for up to three minutes, making it easy for you to jump to another note, copy and paste information from other apps, and more. If you close the Notes app or your device goes to sleep, the note locks again.
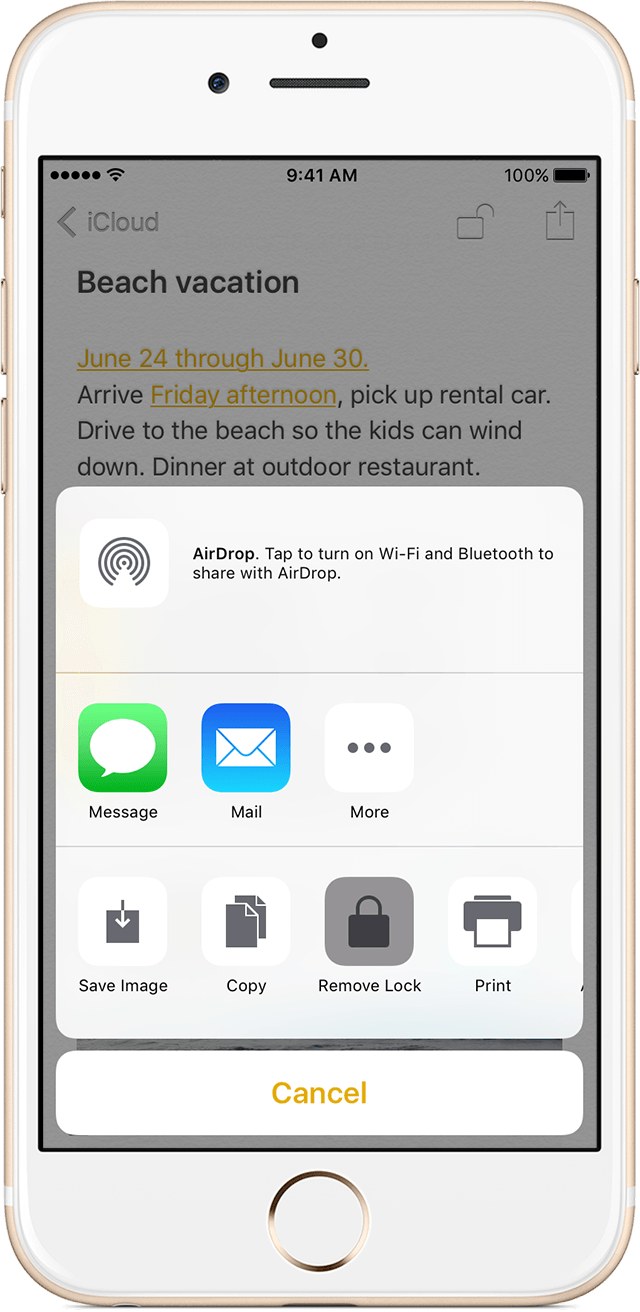
     

Remove a lock

On your iPhone, iPad, or iPod touch:
  1. Tap the locked note.
  2. Enter your password or use Touch ID.
  3. Tap Share icon.   
  4. Choose Remove Lock.
On your Mac:
  1. Click the locked note.
  2. Enter your password.
  3. Click .   
  4. Choose Remove Lock.
When you remove a lock from a note, it's removed on all of the devices that you're signed in to with the same Apple ID.

Change your password

On your iPhone, iPad, or iPod touch:
  1. Go to Settings > Notes > Password.
  2. Tap Change Password.
  3. Enter your old password, then enter a new password and password hint.
On your Mac:
  1. Open Notes.
  2. In the menu bar, choose Notes > Change Password.
  3. Enter your old password, then enter a new password and password hint.
  4. Click Change Password.

If you forgot your notes password

You can unlock a note only when you enter the password that it's locked with. If you forgot your password, Apple can't help you regain access to your locked notes.
You can reset your password, but this won’t give you access to your old notes. It will, however, let you password protect any notes that you create from that point forward with the new password. This could lead to you having multiple notes with different passwords.
If you have multiple passwords, you can't tell which password you should use when you look at your notes in the Notes list. When you open a note locked by your old password but enter your current password, you'll see an alert that you entered the wrong password with a hint for your old one. If you then enter the correct old password, you get the option to update that note's password to your current one.

Reset your notes password

When you reset your Notes password, it doesn't delete or change the password of your notes that are already locked. If you have a note that uses an old password, you can update it to the new password when you enter the old password, remove the old password, then apply your new password to the note.
On your iPhone, iPad, or iPod touch:
  1. Go to Settings > Notes > Password.
  2. Tap Reset Notes Password.
  3. Enter your Apple ID password.
  4. Tap Reset Notes Password again.
  5. Enter your new password and password hint.
On your Mac:
  1. Open Notes.
  2. In the menu bar, click Notes > Reset Password > OK.
  3. Enter your Apple ID password.
  4. Click Reset Password.
  5. Enter your new password and password hint.

Saturday, November 5, 2016

Be My Eyes - helping blind see app

Be My Eyes is an app that connects blind and visually impaired with sighted helpers from around the world via live video 

Thursday, December 31, 2015

Voiceover for iOS let voiceover be your guide

iPad paired with a Braille display in the Notes app.Braille Displays


iOS devices are fully compatible with many refreshable braille displays. You can connect a Bluetooth wireless braille display to read VoiceOver output, including contracted and uncontracted braille and equations using Nemeth Code. And braille displays with input keys can be used to control your iOS device when VoiceOver is turned on.

VoiceOver is a gesture-based screen reader that lets you enjoy the fun and simplicity of iOS even if you can’t see the screen. With VoiceOver enabled, just triple-click the Home button to access it wherever you are in iOS. Hear a description of everything happening on your screen, from battery level to who’s calling to which app your finger’s on. You can adjust the speaking rate and pitch to suit you.


iPhone showing VoiceOver speech output from It's Nice That web site in Safari: 'The intimidating landscapes of the Tour de France captured beautifully by Mark Leary.'

Text Input

Whether you’re composing an email or jotting a note, VoiceOver echoes each character on the keyboard as you touch it, and again when you enter it. Have VoiceOver speak each completed word. A flick up or down moves the cursor so you can edit precisely. To help you type more quickly and accurately, iOS supports multiple character inputmethods — including handwriting — and corrects misspelled words. Enable Speak Auto-text and you hear a sound effect and the suggested word spoken. Keep typing to ignore it, or tap the space bar to have your iOS device type it for you. Pair up an Apple Bluetooth keyboard, and VoiceOver talks you through inputting text in the same way.
iPhone showing the VoiceOver rotor set to move by headings in a Elle Decor web page.

The Rotor

iPhone showing VoiceOver working with autocorrection in the Messages app.
VoiceOver features a virtual control called the rotor. Turning the rotor — by rotating two fingers on the screen as if you were turning an actual dial — changes the way VoiceOver moves through a web page or document based on the setting you choose. When you’re on a web page, turn the rotor to hear settings like “headings,” “links,” and “images.” Then flick to choose how you navigate the page — for example, you can skip from one heading to the next. Move through documents with similar ease. The rotor has settings like “word” or “character” that let you choose how to navigate your text, which comes in handy for checking spelling and grammar. You can customize the rotor elements from a variety of options, including language.


Apps

Because VoiceOver is integrated in iOS, it works with all the built-in apps, including Safari, Mail, App Store, iTunes, Music, Calendar, Reminders, and Notes. You can also create custom labels for buttons in any app — including third-party apps. So it’s even easier to get to your news, word games, or anything else you love on your iOS device. And Apple is working with the iOS developer community to make even more apps compatible with VoiceOver. 

International Voices

VoiceOver includes built-in voices that speak over 30 languages: English (U.S.), English (UK), English (Australia), English (Ireland), English (South Africa), Spanish (Mexico), Spanish (Spain), French (France), French (Canada), German, Italian, Japanese, Korean, Mandarin (Mainland China), Mandarin (Taiwan), Cantonese (Hong Kong), Arabic, Czech, Danish, Dutch, Finnish, Flemish (Belgium), Greek, Hindi, Hungarian, Indonesian, Norwegian, Polish, Portuguese, Portuguese (Brazil), Romanian, Russian, Slovak, Swedish, Thai, and Turkish.

Monday, July 6, 2015

What you should do before selling an iOS 7 device (iPhone/iPad/iPod touch)


If you still have your iOS device

Before you sell or give away your iOS device, make sure that you've removed all of your personal information. Follow these steps to protect your data and get your device to its factory default state for the new owner:


Back up your Device

Back up your device Use iTunes On Your Computer.

Use iCloud

iCloud Backup provides an easy and reliable backup solution for customers who want to back up their iOS devices wirelessly and automatically.

Back up to iCloud

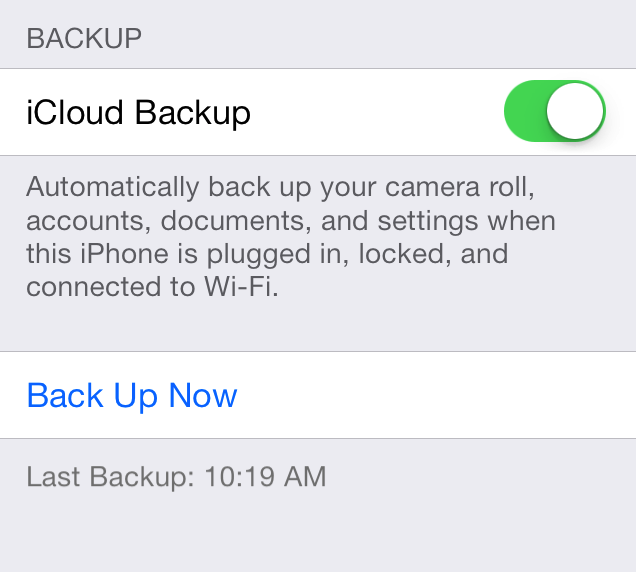
If you're using iCloud, it can automatically back up your data if you've chosen this option. You can verify your iCloud backup and make sure that it's up to date by following these steps:

  1. Tap Settings > iCloud > Storage & Backup.
    iCloud backup settings
  1. Turn on iCloud Backup if it's off.
  2. Tap Back Up Now

AllAccess.US: Scan Logos, Access Menus, Deals & More!


All Access: SCAN LOGOS & QR CODES to Access Menus/Deals/Coupons by AllAccess.US

SCAN LOGOS TO ACCESS TALKING MENUS, DISCOUNTS, COUPONS, TICKETS, DIRECTIONS & MORE! You can scan QR Codes or ACTUAL LOGOS! Or browse for local businesses by name or category! The app has access to over one million menus & 2,000+ logos! Add your brand's logo & info by contacting us at AllAccess.US!

Thursday, January 29, 2015

How to Delete An iCloud Account from iPhone/iPad in iOS 8

Deleting/removing your iCloud account from your iPhone/iPad has changed a tiny bit in iOS 8. While all processes remain the same, Apple changed the button labels. Instead of Delete, you now have Sign out.
For those of you who are new to the iOS ecosystem and would like to know how to delete the iCloud account from your iPhone/iPad, this post should be helpful. Dive in.

How to Delete An iCloud Account from the iPhone and iPad in iOS 8
How to Delete iCloud account on your iPhone/iPad Running iOS 8:
  • Open Settings
  • Tap on iCloud
Access iCloud on iPhone in iOS 8
  • Scroll way down and tap on Sign out
Sign out from iCloud in iOS 8
  • Tap on Sign out in the alert message

iCloud Signout Alert Messsage
  • Now, you’ll see the Delete Account alert.
Remove iCloud Account from iPhone and iPad in iOS 8
  • If you want to keep all Safari reading list/bookmarks/saved pages data on your iDevice (or if you want to keep all the contacts on the iPhone/iPad), make sure you tap on Keep on my iPhone/iPad.
  • If you don’t want to keep all that data, you can tap on Delete from My iPhone/iPad.

Thursday, November 13, 2014

How to Stop Other Devices Ringing When iPhone Gets a Phone Call

If you have multiple devices running iOS 8 and using the same Apple ID, you’ve probably noticed that an incoming phone call rings on every one of the devices at the same time. In other words, an inbound phone call will ring not only your iPhone, but also any other iPad, iOS device, or Mac too if it’s running OS X Yosemite. While this feature can be convenient and make it much less likely that you’ll ever miss a phone call, it can also be a nuisance if you have a desk full of hardware that is all buzzing simultaneously.
To stop the iPhone from ringing your other devices with an incoming phone call, you need to visit the Settings of the iPhone which has the cellular connection that originally receives the phone call. You can also choose to selectively disable the ringing feature on other devices if you’d like to just opt a single device out. Here’s what you’ll want to do:
  1. Open the Settings app on the iPhone and go to “FaceTime”
  2. Toggle the switch for “iPhone Cellular Calls” and flip it to the OFF position
  3. Exit out of Settings as usual

This puts an end to the multiple device ringing feature. 
It’s worth mentioning that if you turn this feature off you can’t make phone calls from your Mac or other iOS device by way of your iPhone cellular connection. Despite being in the FaceTime settings, it has no effect on standard FaceTime audio calls made from a Mac or FaceTime VOIP from iOS, and FaceTime video chat still works as usual too.
Separately, you can choose to disable the iPhone calling feature on the Mac as well. 
Keep in mind there is a physical proximity limit with this feature, so if you’re many miles away from your other devices, your iPhone isn’t going to ring the hardware left at your office or home. Apple hints at this in the settings with the toggle switch, describing the feature as follows: “Use your iPhone cellular connection to make and receive calls on devices signed into your iCloud account when they are nearby and on Wi-Fi.”

Friday, November 7, 2014

How to use VoiceOver for visual accessibility on iPhone and iPad


The iPhone and iPad have some great accessibility features for people with hearing and sight impairments that makes using iOS more enjoyable, and less frustrating. For visually impaired individuals, the VoiceOver feature allows your iPhone or iPad to speak selections and add custom gestures so you know exactly what you're tapping on before selecting it. You just need to enabled it first.
  1. Launch the Settings app from the Home screen of your iPhone or iPad.
  2. Tap on General.
  3. Tap on Accessibility.
  4. Under Vision at the very top, tap on VoiceOver.
  5. Turn On VoiceOver by tapping on the On/Off toggle.
  6. You can scroll down with three fingers to view VoiceOver options and customize your experience.

How to use VoiceOver on iPhone and iPad

VoiceOver changes the gestures in iOS in order to make it easier for visually impaired individuals to know what they're tapping on before they actually select it. Here are some tips to using VoiceOver:
  • Single tap anywhere on the screen and your iPhone or iPad will speak aloud the item that you're tapping on.
  • Double tap on an item to select it.
  • To scroll through a page, use three fingers. With VoiceOver off you typically use only one finger to scroll, in VoiceOver, you'll need to use three so your iPhone or iPad doesn't misread a tap as a scroll.
  • To toggle speech commands on and off from the Lock Screen, double tap withthree fingers.
  • two finger double tap while performing an action will start or stop that action. For example, if you're on a phone call, double tapping the screen with two fingers will end the call. If you're in the Camera app, double tap with two fingers to take a photo.
  • In VoiceOver options you can customize and fine tune options such as whether or not you'd like the device to speak notifications.
For more tips and tricks regarding VoiceOver, we recommend using the VoiceOver Practice option within the VoiceOver Settings menu. This allows you to tap the screen as you'd like and the iPhone or iPad will speak aloud what that action does system wide. This will help get someone used to how VoiceOver works and what commands trigger what actions.
If you've come across any interesting VoiceOver options, feel free to share them in the comments below!


Thursday, September 18, 2014

How to enable and use Hey Siri handsfree mode in iOS 8

Apple's voice-controlled personal assistant Siri becomes even more powerful with iOS 8, including an entirely hands-free mode that allows users to ask questions and accomplish tasks by simply first saying the words "Hey, Siri."


After installing iOS 8, users can enable Siri's new handsfree mode by opening their iPhone or iPad's Settings application, choosing General, and then Siri. From there, simply ensure that the switch for "Allow 'Hey Siri'" is turned on.

"You can speak to Siri without pressing the home button by saying 'Hey Siri' when connected to power," iOS 8 notifies users.


"Hey, Siri" works in any situation as long as the iPhone or iPad is plugged in, even if the screen is locked or if an application is open and running. Users can simply speak naturally, and do not need to pause after saying "Hey, Siri."

In addition to the new handsfree mode, will Siri also tap into the HomeKit features Apple has baked into iOS 8. As new applications and third-party accessories hit the market, users will be able to use Siri to accomplish tasks like adjusting the temperature in their home, closing the garage door, or even locking the front door.

Tuesday, September 16, 2014

The Coolest 21 Features IOS8 You Didn't Know About

Tomorrow September 17 iOS 8 is available for us all to download.
The Coolest 21 Features in iOS 8 You Didn't Know About or remember.
Some of these features may or may not be useful for those who are blind or visually impaired but we will add them all anyway just so you can learn more. This will be a brief overview. We will be covering each one of these features in the future one at a time.
Apple's newest mobile operating system, iOS 8, is almost out for the general public, and we've got a rundown on the best new features you can expect on your iPad, iPhone, and iPod touch. While there's not a huge visual change as there was from iOS 6 to iOS 7, there's still plenty of cool new features in iOS 8 to be excited about.


1. Find Out What Apps Are Killing Your Battery
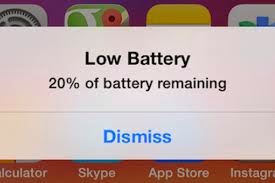
Don't you just hate it when you get the dreaded low battery screen on your eye device. Now monitoring battery usage has never been easier on iOS. Now you can easily view battery usage on a per-app basis to aid in tracking down battery-hogging apps.


2. Reply to Texts Faster with Interactive Notifications


Notification banners and alerts are interactive! From anywhere on your device, even your lock screen, pull down on the notification to quickly respond to text messages, trash emails (or mark them as read), snooze a reminder (or mark it as complete), and accept/decline calendar invites. Through Facebook and other third-party apps, you'll be able to perform similar functions from the banners, like commenting on or liking a post.


If you're afraid of your privacy being invaded—since friends and family could potentially do something destructive through these notifications on your lock screen—you can disable notifications for each app through the "Notifications" settings. Additionally, developers will require passcodes for certain lock screen notifications.


3. Use Siri with No Hands

With the addition of a voice-activation feature, you can now activate Siri by saying "Hey, Siri" out loud whenever the device is connected to a power source, although the iPhone will be able to utilize this feature without a power connection.Siri will then listen for your commands, which is especially useful when your hands are busy while you're driving, which makes calling someone or finding directions a completely hands-free experience.

4. Siri Makes Shazam Super Easy

Another new feature with Siri is the built-in Shazam integration. Just activate Siri and ask "What song is playing?" or "What song is this?" Siri will then listen and pull up a listing of the song and artist, with a link to purchase it directly from iTunes. 

5. There's Predictive Text in the Keyboard

With predictive text, called QuickType, you can type in a few letters and your keyboard will provide options for it thinks you might type next. Once you type a complete word, you'll see suggestions for common quotes or phrases, celebrities and musicians, movies and television shows, and more.
QuickType also intelligently analyzes the last text sent to you. When asked questions through text messaging, QuickType will usually offer options likeyesnosure thing, or I'll get back to you.
If you receive a message with two options and an "or" in-between them, QuickType intelligently pulls the two options from the message sent to you, as suggestions.

6. You Can Now Use Third-Party Keyboards

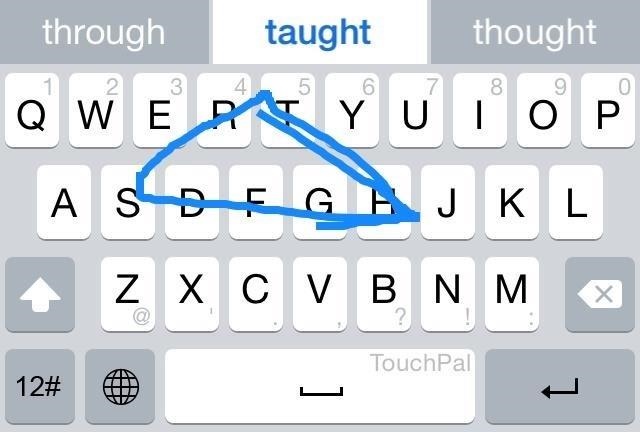
Another huge addition to the iOS keyboard is third-party keyboard integration, bringing the likes of Fleksy, SwiftKey, TouchPal, and more.
With a keyboard such as TouchPal, you can use swipe gestures to spell out words and phrases without lifting a finger, as well as the ability to enter numbers and punctuation without changing keyboards.
Image via wonderhowto.com
Other keyboards like TextExpander provide useful tools such as easy-to-use keyboard shortcuts, while QuickBoard for iOS 8 integrates copy and paste boards directly on the keyboard; all of which will make typing on iOS 8 something spectacular.

7. There's Snapchat-Like Self-Destructing Media

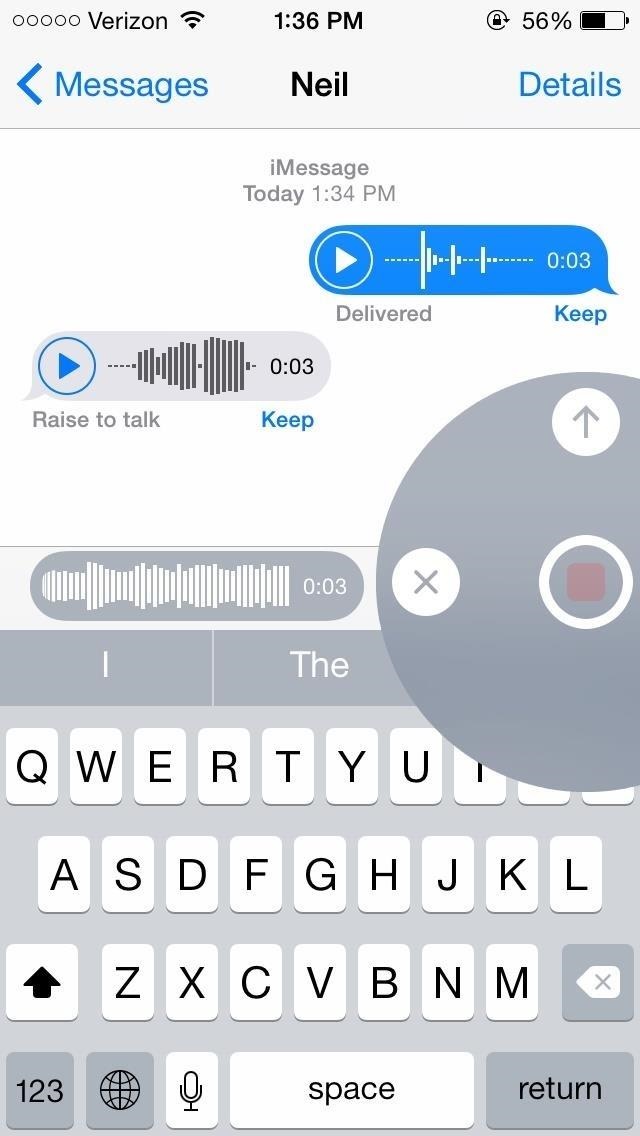
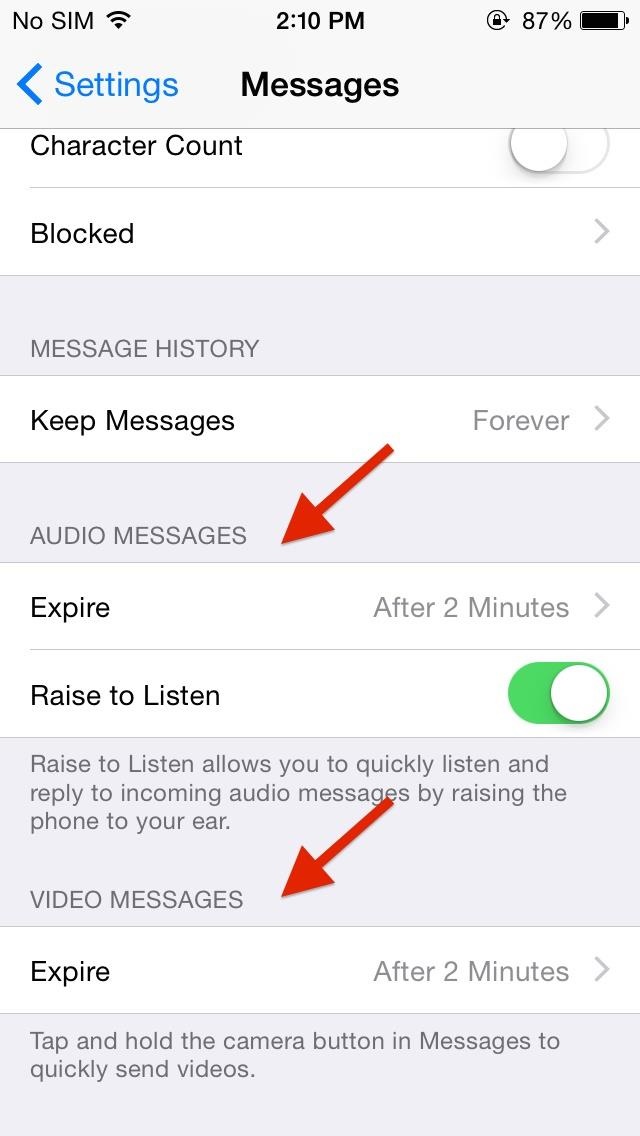
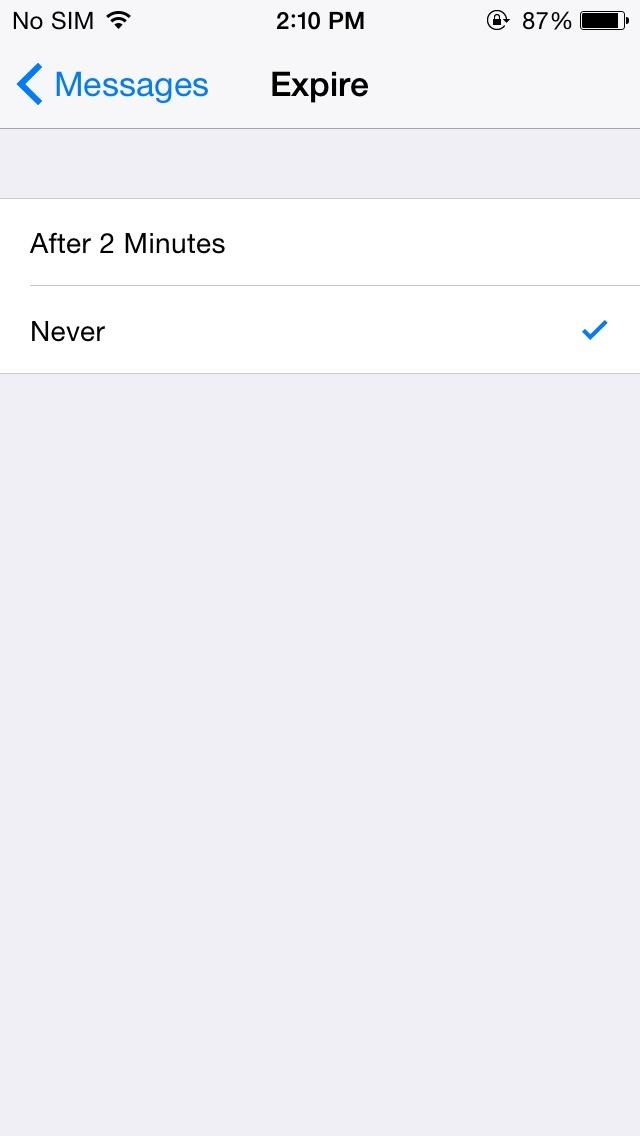
Inspired by Snapchat's ephemeral nature, iOS 8 now brings self-destructing audio, imagess, and videos to the stock Messages app. Hold down on the microphone or camera icon and quickly take a photo, record a video, or lay down some audio. When you release the icon, the files will send, but will then self-destruct after a set period of time.
Vice president of iOS product marketing Greg Joswiak says about this feature, "You don't want to have to clean these up. Audio and video messages can take up space, so they're set to self-destruct unless you choose to keep them."
However, you can save these files if you want by adjusting your settings.

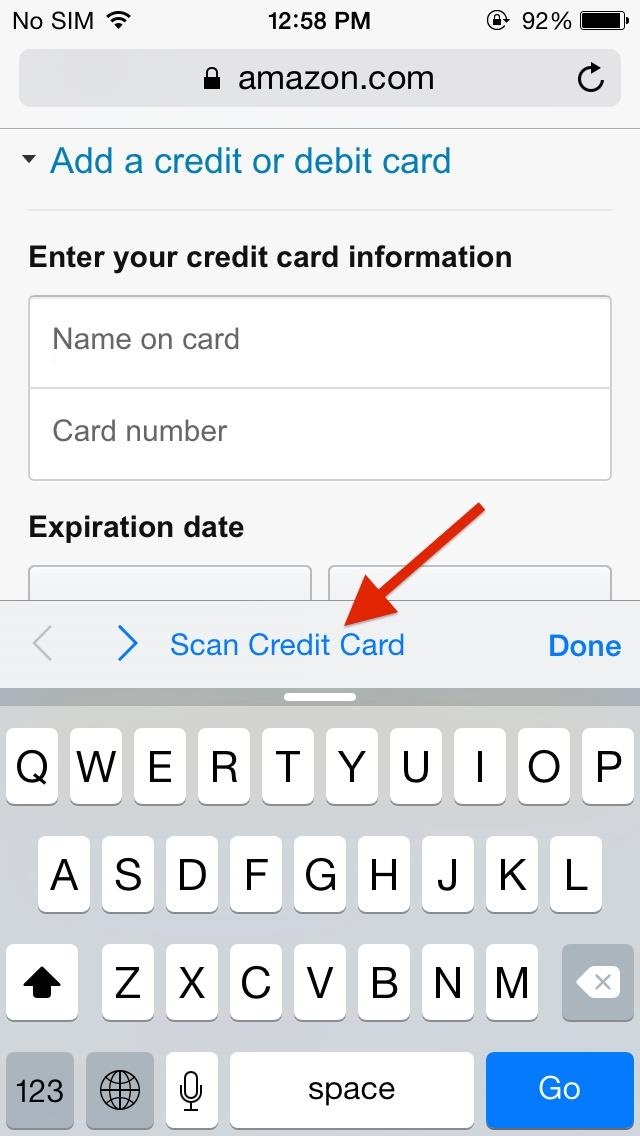
8. Scan Payment Cards to Auto-Fill Data

When making online purchases through Safari, you can now save yourself the hassle of manually inputting card information. Instead, just snap a picture of it and watch your relevant information automatically fill in the form. This worked extremely well on Amazon, but failed when using Midtowncomics, so while it's not universal, it should work with most major online retailers.

9. Battery-Saving Grayscale Mode

With the iPhone 6 stocked with a crisp, Sapphire AMOLED display, placing the device in grayscale mode will help extend battery life. By rendering pixels black and inactive, therefore not utilizing the backlight, grayscale reduces battery drain. 

Battery-Saving Grayscale Mode Will be useful for those who are completely blind. Turning on grayscale mode Will help you save some battery.


10. FaceTime Gets "Call Waiting"

By popular demand, FaceTime now has a "call waiting" function displayed when receiving a request during a current FaceTime session. Now it's easy to decline the incoming call, or end your current one while accepting the new one. Of course, accepting the new call ends the old one, so it's not exactly like the call waiting we all know and love.
[1] Oh cool. [2] You can FaceTime with yourself!

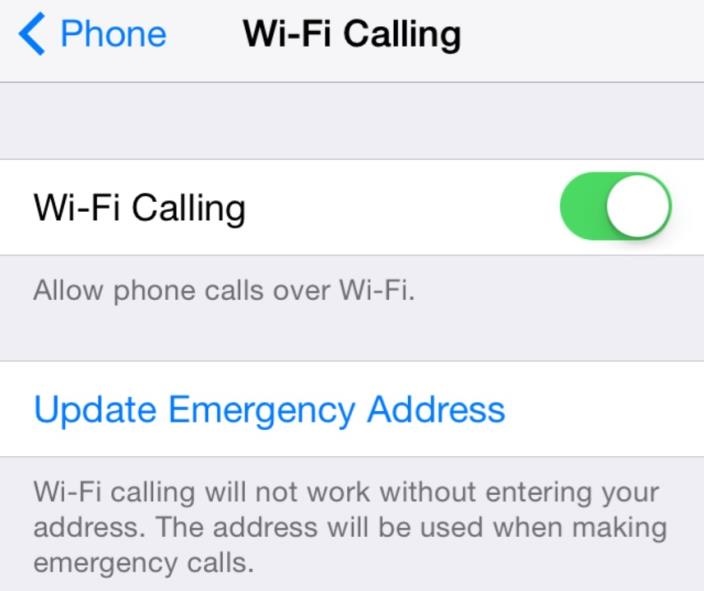
11. There's Wi-Fi Calling Now

Wi-Fi calling won't just help save your data, but according to those who have used it, the calls sound clearer. As of now, this feature is only present on the T-Mobile variant. Expect this function to roll out to all carriers in the very near future.
To enable it, head into Settings -> Phone -> Wi-Fi Calling, then simply toggle it on. When enabling Wi-Fi calling, you must enter a physical address, presumably on the off-chance that you'll need to make an emergency call.

12. You Can Now Leave Annoying Group Chats

Leaving group chats is one feature that many have long asked for (including myself), simply because group messages can become an annoyance after a while, accumulating hundreds of texts and, subsequently, notifications.

13. Access All Attachments in a Message Thread

Accessing all attachments in Messages is a very useful feature, allowing you to easily find and save all of the pictures, videos, and audio files shared between you and another person, without having to scroll through the entire conversation.

14. Send Multiple (Recent) Pictures at Once

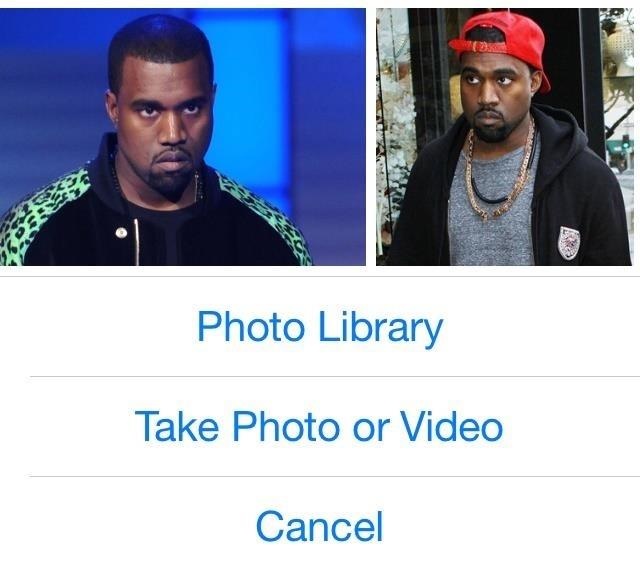
Sharing pictures is also now easier do, with a preview of recent photos showing up when you tap on the keyboard's camera icon.
Image via wonderhowto.com

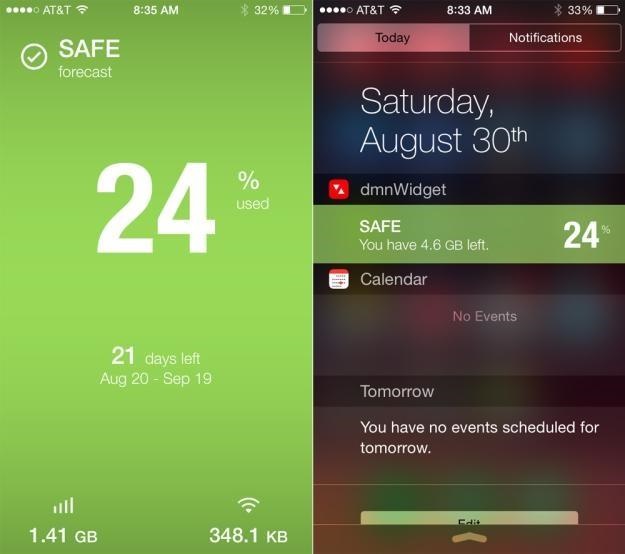
15. There's Widgets in the Notification Center

While not as good as they could be, widgets are finally available in iOS 8, accessible only through the Notification Center. Just scroll down from the top of the screen and you'll be able to access important information from your favorite apps, as well as perform truncated functions.
Image via BGR


16. Get Faster Access to Recent Contacts


By double-pressing the Home button in iOS 8, you not only get access to the app switcher, but you can now see "Phone Favorites" and "Recents" in theretoo. Just tap on a contact bubble to get options for phone calls, text messages, and FaceTime (or FaceTime audio) to keep in touch quicker with the people you contact the most.

17. Time-Lapse Videos!
Apple has now added a native time-lapse feature to their stock camera in iOS 8, shooting photos in dynamically selected intervals.  If you don't want this feature enabled, maybe to prevent others from knowing who you've recently contacted, you can disable it. Actually, you can disable "Phone Favorites" or just "Recents"—even both if you want. See how here.

18. New Photo-Editing Tools

In the stock photo-editing tools, you can now fine-tune every aspect of a photo, such as automatically straighten horizons, modify light and adjust exposure, brightness, contrast and more.

19. Set Timers & Control Exposure in the Camera

Set a three or ten second timer directly from the camera viewfinder, as well as manually change the exposure by swiping up and down on the screen.

20. Do More in Notes

In the new version of Notes for iOS 8, you'll be able to jot down your notes in rich text (bold, italics, and underline), as well as be able to include photos.

21. Recover Deleted iPhone Photos

In iOS 8, you'll no longer have to worry about recovery tools or performing backups to get back your deleted photos. Apple is taking a preemptive approach to accidental deletions by allowing you to easily recover pictures or videos directly from your iPad or iPhone. 

What do you think of the new iOS 8 for iPad, iPhone, and iPod touch. Share your thoughts below, or chat with us on Facebook.