The feature lives inside Apple’s Find my iPhone app, which allows users to locate their missing iOS devices on a Map via iCloud and a standalone iOS app. But since the AirPods rely on Bluetooth connectivity, it will only be able to locate the AirPods if they are in range of your other Apple devices. So, if you happen to lose one and don’t realize until after, you’d have to walk back in range in order to get a hit on the map. With Bluetooth, you can potentially get up to 5-10 meters of range.
The app will also allow you to play a sound from the AirPods that will help you locate one that is out of sight, which will probably be much more useful than the map feature that only gives you a very general location if in range. You can disable the sound for one AirPod, which can be handy if you only lose one and not the other.
Apple warns to make sure they aren’t in your ears when activating the sound, which has to be quite a bit louder than comfortable listening levels in order to work to help you locate a missing AirPod. The sound does, however, gradually get louder, which helps prevent hurting your ears.
Step one
login to your find my iPhone app on your iPhone, iPad or you can login from your Mac using iCloud.
Step 2
Select your your Apple AirPods from the list of devices.
Step 3
Tap on actions. Then tap on play sound. The sound will gradually get louder. Once you find it hit pause. And then you can close out whatever you using to find it.
Start an email on your iPhone and finish it on iPad. Or copy images, video, and text from your iPad, then paste to your nearby Mac. You can even use AirDrop to share files wirelessly — and instantly — between devices.
Each of these features, together known as Continuity, allow your devices to work together so that you can do more. Make and receive phone calls without picking up your iPhone. Start an email, edit a document, or surf the web on one device, then pick up where you left off on another. Unlock your Mac without typing a password. Even activate your iPhone hotspot without taking your iPhone from your pocket or bag.
With Handoff, you can start work on one device, then switch to another nearby device and pick up where you left off.
Set up Handoff
Use Handoff with any Mac, iPhone, iPad, iPod touch, Apple Watch that meets the Continuity system requirements. Handoff works when your devices are near each other and set up as follows:
On one device, copy the text, image, or video as you normally would. That content is automatically added to the clipboard of your other nearby device. It remains there briefly, or until you replace it by copying something else on either device. To learn more go to.
With the iPhone Cellular Calls feature, you can make and receive calls from your Mac, iPad, or iPod touch when those devices are on the same network as your iPhone.
Set up iPhone Cellular Calls
Use iPhone Cellular Calls with any Mac, iPhone, iPad, or iPod touch that meets the Continuity system requirements. It works when your devices are near each other and set up as follows:
Each device is signed in to FaceTime with the same Apple ID.
Each device has Wi-Fi turned on.
Each device is connected to the same network using Wi-Fi or Ethernet.
On iPhone, go to Settings > Phone > Calls on Other Devices, then turn on Allow Calls on Other Devices.
On iPad or iPod touch, go to Settings > FaceTime, then turn on Calls from iPhone.
On Mac, open the FaceTime app, then choose FaceTime > Preferences. Click Settings, then select Calls From iPhone.
If your carrier supports Wi-Fi calling on other devices, you can set up those devices to make and receive calls even when your iPhone isn't turned on or nearby.
Or open the FaceTime app and enter the phone number in the search field. Tap the phone number in the search result, then tap Call.
Make a call on your Mac
Move the pointer over any phone number in Contacts, Calendar, Safari, or other app that automatically detects such data. Click the arrow in the box that outlines the phone number, then choose Call [phone number] Using iPhone.
Or open the FaceTime app and enter a phone number in the search field. Control-click the phone number in the search result, then choose the phone number from the pop-up menu.
Answer a call
On iPad or iPod touch, slide to answer the call.
On Mac, a notification appears when someone calls your iPhone. From there you can answer the call, send it to voicemail, or send the caller a message.
To stop getting calls at one of your devices, just turn off the Calls from iPhone setting on that device. See the setup section above for details.
If you have an iPhone, the text messages that you send and receive on your iPhone can appear on your Mac, iPad, and iPod touch as well. You can then continue the conversation from whichever device is closest to you.
Set up SMS and MMS messaging
Use this feature with any Mac, iPhone, iPad, or iPod touch that meets the Continuity system requirements. Make sure that your devices are set up as follows:
On iPhone, go to Settings > Messages > Send & Receive. Make sure that the Apple ID at the top of the screen is the same Apple ID that you're using for iMessage on your other devices. Add a check to your phone number and email address, so that you can be reached by iMessage at both. Do the same on your iPad or iPod touch.
On iPhone, go to Settings > Messages > Text Message Forwarding, then choose which devices to allow to send and receive text messages from this iPhone. If you're not using two-factor authentication for your Apple ID, a verification code appears on each of your other devices: enter that code on your iPhone.
On Mac, open Messages, then choose Messages > Preferences. Click Accounts, then select your iMessage account. Make sure that the Apple ID shown here is the same Apple ID that you're using on your other devices. Add a check to your phone number and email address.
Use SMS and MMS messaging
To use this feature, just start conversations as normal in the Messages app on any of your devices. You can also start a conversation by clicking a phone number in Safari, Contacts, Calendar, or other apps that detect phone numbers. All of your incoming and outgoing messages appear on all of your devices.
With Instant Hotspot, the Personal Hotspot on your iPhone or iPad (Wi-Fi + Cellular) can provide Internet access to a Mac, iPhone, iPad, or iPod touch without requiring you to enter the password on those devices.
Set up Instant Hotspot
Use Instant Hotspot with any Mac, iPhone, iPad, or iPod touch that meets the Continuity system requirements. It works when your devices are near each other and set up as follows:
Your iPhone or iPad (Wi-Fi + Cellular) has Personal Hotspot turned on in Settings > Cellular > Personal Hotspot.
Your device must have an activated carrier plan providing Personal Hotspot service.
in the menu bar to choose the name of the iPhone or iPad providing your Personal Hotspot
On iPad, iPod touch, or even another iPhone, go to Settings > Wi-Fi, then tap the name of the iPhone or iPad providing your Personal Hotspot
If you're asked for a password when connecting, make sure that your devices are set up as described above. The Wi-Fi status icon in the menu bar shows the Personal Hotspot icon
as long as your device remains connected to your Personal Hotspot.
Set up and use Auto Unlock
Auto Unlock gives you instant access to your Mac when wearing your Apple Watch. Just wake up your Mac and you’re ready to go—without typing a password. Learn how.
Now that you’ve taken your first step into the iOS world with multitouch gestures, it’s time to learn how to navigate your device. We’ll go over where your apps are stored, how to organize them, search for them, and delete them.
The Home screen: When you first turn on your device, you’re brought to the Home screen. Here, you’ll see an assortment of icons grouped into rows, and several more icons grouped in the silver Dock along the bottom of the screen. The Home screen is where your apps live, and where you can launch them. Because only 16 apps will fit on one Home screen (20 on the iPad), you can have multiple app pages or screens for organizing your apps (up to 11). Above the Dock, you’ll see a series of dots, with one highlighted in white; these dots signify the number of app pages you have. Swipe left or right to go from page to page.
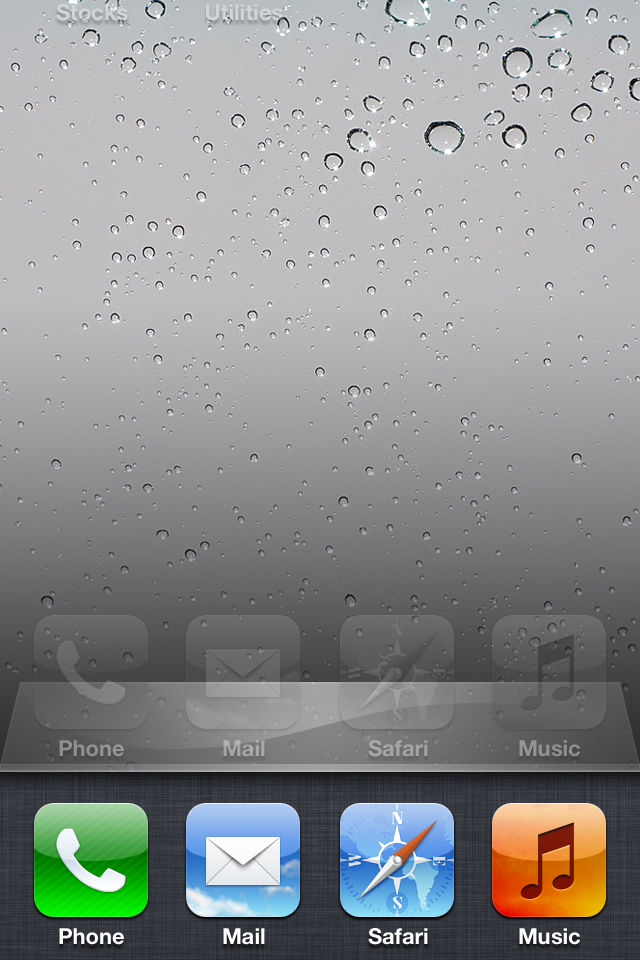
The Dock: The silver translucent bar along the bottom of your Home screen is called the Dock. If you’ve tried swiping between app pages, you’ll notice the icons in the Dock don’t change. That’s because the Dock is for apps you most frequently use; instead of having to swipe from page to page to find an app, you can drop it directly into the Dock for easy access. You can store up to four apps in the Dock.
Search in Spotlight: You can search for every email message, webpage, and app on your device, or search through Google or Wikipedia, by swiping right on your Home screen until you reach Spotlight. (If you're on the first Home screen page, pressing your Home button also summons the Spotlight screen.) To search, just type your query in the text box at the top.
Open and close an app: Want to launch an app? To open it, all you have to do is tap its icon. Once it’s open, you can return to the Home screen at any time by pressing the Home button.
Rearrange and delete apps: To rearrange the order of your icons, tap and hold any icon on the Home screen. After a few seconds, all your app icons, including the one you’re holding, will start to wiggle, and a small black X will pop up in each icon’s top left corner. Once they do this, you can rearrange any apps on the Home screen, or even drag them into or out of the Dock. If you’ve installed a third-party app you don’t want anymore, you can tap the X to delete it (you cannot delete the apps that came preinstalled on your device). When you’re finished, press the Home button, and your icons will stop wiggling and stay in their new location. You can also rearrange your icons and Home screen pages through iTunes when you connect your device to your computer.
Note that you’re not able to delete the built-in apps that come with your iOS device. These include Camera, Photos, YouTube, Clock, Weather, and the all-new Newsstand folder, among others. You’ll be able to tell which apps you can’t delete—they don’t sport the black X. You are able to move around these built-in apps to your liking, however.
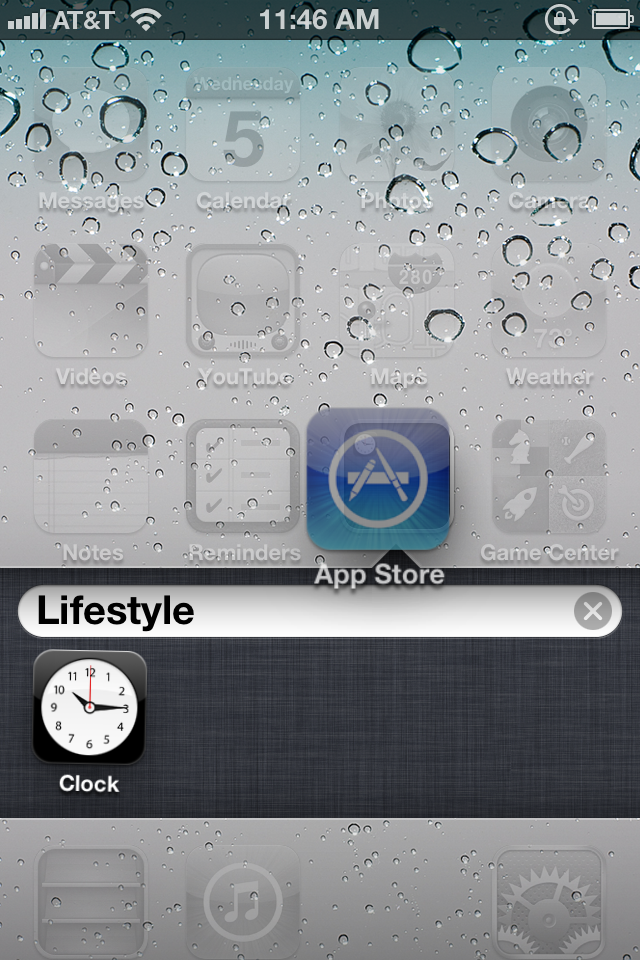
Use folders: Having a bunch of apps scattered on your Home screen is OK if you don’t have too many, but when you start amassing a collection, you can use app folders. A folder is a group of apps, represented by a single icon, on your Home screen. Each folder sports miniature icons representing the apps inside, along with an overall name. When you tap a folder, the Dock fades and slides down, making room for a view of the folder’s contents. Within, you’ll find the name and icon for each app. Tap any app to launch it, or tap anywhere outside the folder to return to the Home screen.
To create a folder, start by tapping and holding any app icon to enter edit mode; after the icons begin to wiggle, drag an app on top of another app. When you release the app, you’ll create a folder, which will open and display both apps. By default the folder is named based on the App Store category for one of the first two apps in the folder. If you want to customize this name, just tap inside the field (while still in edit mode) and enter something new. When you’re done, press the Home button to exit edit mode.
To add another app to the folder, reenter edit mode and drag the desired app onto the folder icon. Repeat until you’ve added all the apps you want (up to 12 per folder on the iPhone or iPod touch; 20 on the iPad), and then press the Home button to exit edit mode.
To edit the folder itself, its name, contents, or the layout of the apps inside, you can either enter edit mode and then tap the folder, or, while the folder is open, tap and hold any icon inside. You can then tap the folder’s name to change it, drag apps within the folder to rearrange them, drag an app out of the folder to return it to the Home screen, or tap an app’s Delete button to completely delete it from your device. Unlike apps, folders don’t have a Delete button; to delete a folder, you must remove all the apps from it.
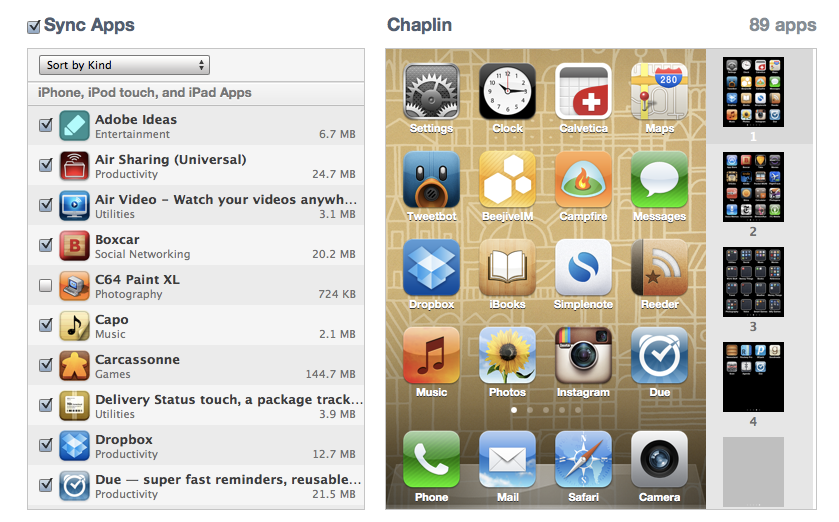
Manage folders from iTunes: iTunes has long allowed users to manage installed apps when syncing, and you can edit your folders too, using your mouse and keyboard. When your device is connected to your computer, the Apps tab in iTunes lets you choose which apps to sync, as well as decide how to organize these apps. Drag an app onto another app and, after a slight delay, a folder is created—just as if you’d performed the same action on your device. You get the same editable folder name, and you can rearrange icons within the folder. Since you’re using a computer, you don’t need to click and hold to enter the jiggling-icon edit mode; you can click and drag anytime. Similarly, to edit an existing folder, just double-click it.
Multitask on your iOS device
Opening and closing an app is easy: Tap the app to open it, and then press the Home button to close it. But when you exit, you’re not actually shutting down the app: You’re freezing it in place, or sending it to run in the background. This means you can have multiple active apps running at any one time, and you can even switch between active apps without returning to the Home screen.
Frozen apps versus background apps: Sometimes you need an app to keep doing something when it’s not in the foreground. For that reason, Apple allows apps to perform tasks in the background using several tools. One of these tools is the push-notification system; another allows music apps to keep playing while the user switches to another app; yet another allows tasks, such as photo uploads, to continue running in the background even if you switch out of the program performing the upload. If your third-party app doesn’t incorporate one of these background features, it will “freeze”, which is to say it will remember whatever you were just doing when you re-open it, but will not process any data in the background.
The multitasking bar: You can quickly switch between apps by bringing up the multitasking bar. To do so, quickly double-press the Home button; a bar below the Dock will rise up from the bottom of the screen, showing off the apps most recently run. To switch to a different app, tap its icon.
Multitasking shortcuts: In addition to holding a list of your most recently used apps, the multitasking bar has a couple of other neat shortcuts for your device.
If you swipe up from the bottom with one finger, you’ll bring up a secondary set of controls. On the iPhone or iPad, you can control the music currently playing on your device, (it defaults to the Music app, but you can also control music from third-party apps).
device's brightness, slider for controlling volume. Airplane mode, wi-Fi, bluetooth, do not disturb, AirDrop, flashlight, Calculator, camera, lock.
Deleting/removing your iCloud account from your iPhone/iPad has changed a tiny bit in iOS 8. While all processes remain the same, Apple changed the button labels. Instead of Delete, you now have Sign out.
For those of you who are new to the iOS ecosystem and would like to know how to delete the iCloud account from your iPhone/iPad, this post should be helpful. Dive in.
How to Delete iCloud account on your iPhone/iPad Running iOS 8:
Open Settings
Tap on iCloud
Scroll way down and tap on Sign out
Tap on Sign out in the alert message
Now, you’ll see the Delete Account alert.
If you want to keep all Safari reading list/bookmarks/saved pages data on your iDevice (or if you want to keep all the contacts on the iPhone/iPad), make sure you tap on Keep on my iPhone/iPad.
If you don’t want to keep all that data, you can tap on Delete from My iPhone/iPad.
Authorizing an iPhone, iPod, iPad, Mac, or PC on your iTunes account means you can uses it buy new apps, music, movies, TV Shows, and iBooks, re-download previous purchases, access iTunes Match and more. Because of licensing agreements, you can only have 10 devices total, and a maximum of 5 computers total, authorized on your iTunes account at any one time. Once you hit 10, you'll have to remove an old device to add a new one. If you give away, sell, or lose a device, you might want to remove it as well. Luckily the process it fairly straightforward and can be done right from iTunes on any Mac or PC.
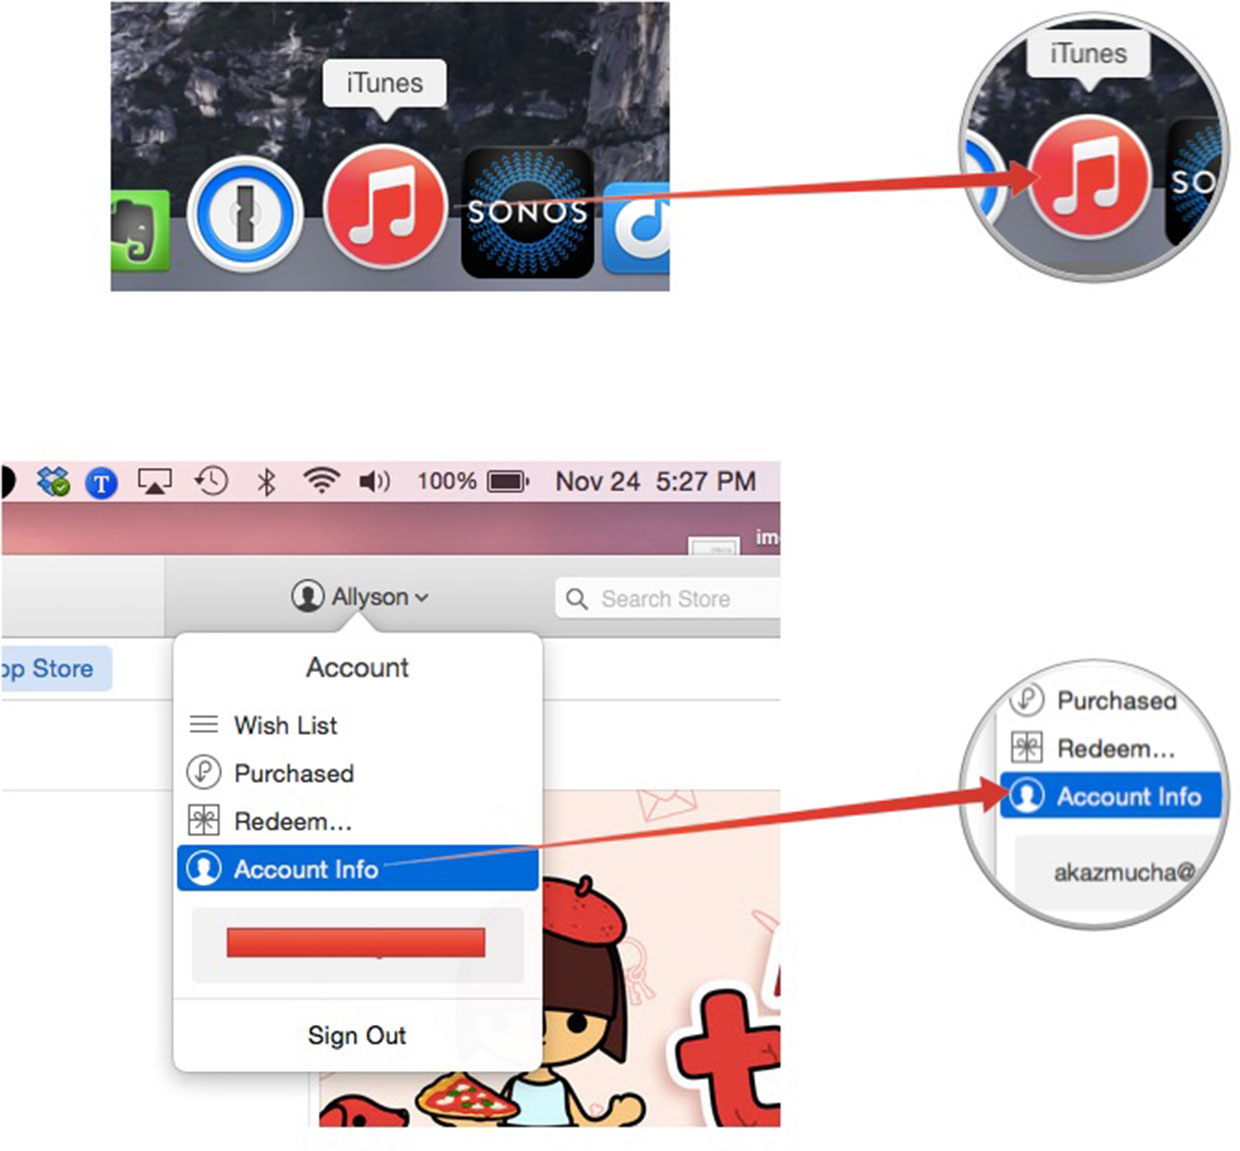
Launch iTunes on your Mac or PC.
Click on your name in the upper right hand corner of iTunes. In the menu, click on Account Info.
Type in your iTunes password when prompted in order to continue.
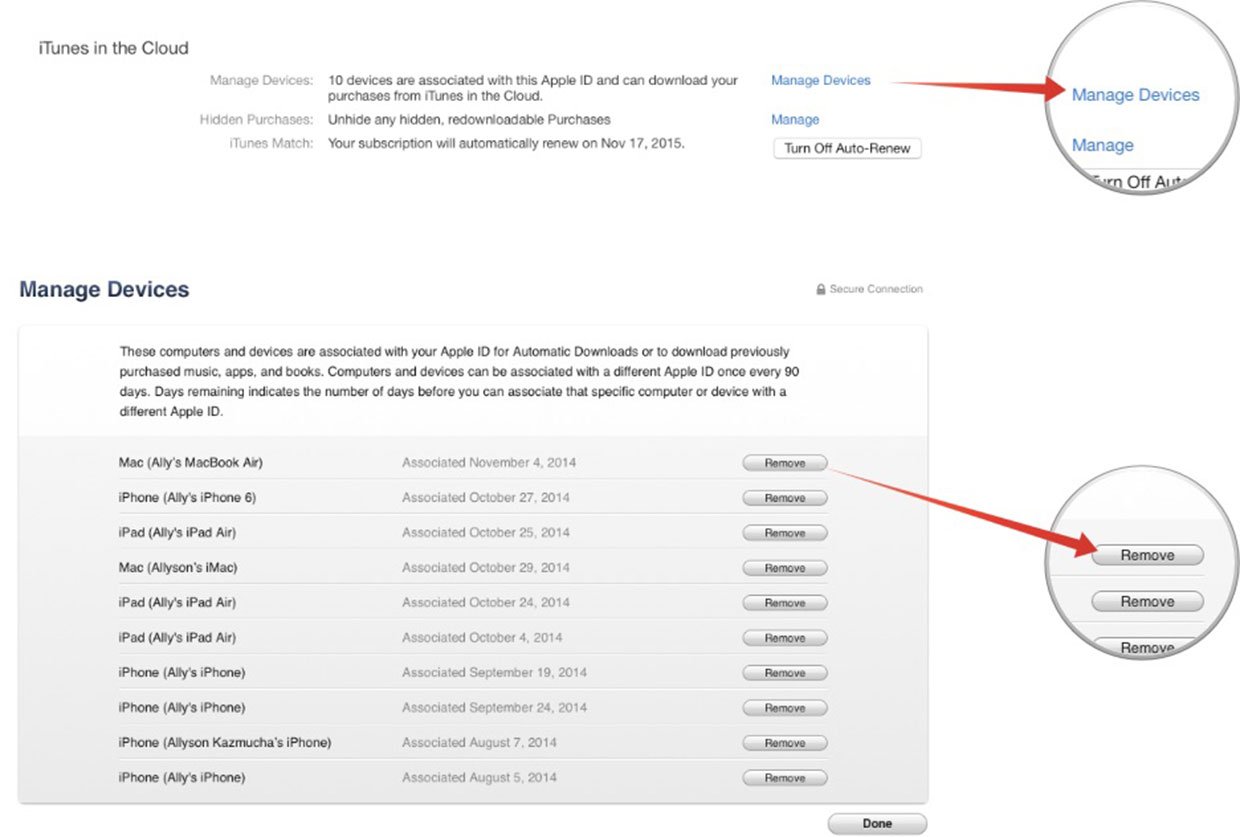
When your account loads, click on Manage Devices under the iTunes in the Cloud section.
Click on Remove next to the devices you want to remove.
Those with vision problems will like OS X because it provides an array of features to make using it more comfortable. Visually-impaired Mac users can change the default sizes of on-screen print, and use the keyboard and mouse to give computer commands. You control most of these features from the Universal Access window in System Preferences.
When you click on the Universal Access icon, you see the Seeing pane, where you can control features that aid people who have trouble seeing. Note that the pane appears in large type to avoid the problem where someone with limited vision can’t use the tool to increase the type size because the tool’s type size is too small.
VoiceOver
VoiceOver is the remarkable screen reader that comes standard with every Mac. But it’s much more than a text-to-speech tool. It tells you exactly what’s happening on your Mac, and lets you fully interact with it using gestures, a keyboard, or a braille display. And it uses Alex, the voice of Mac, who speaks to you in a natural tone.
Zoom is a powerful built-in magnifier that lets you enlarge your screen up to 20 times, so you can better see what’s on the display. You can use it full screen or picture-in-picture, allowing you to see the zoomed area in a separate window while keeping the rest of the screen at its native size. The hardware acceleration engine lets you boost the size of everything on your screen — text on a web page, family photos, a place on a map.
Dictation
Dictation lets you talk where you would type — and it now works in over 40 languages. So you can reply to an email, search the web, or write a report using just your voice. Navigate to any text field, activate Dictation, then say what you want to write. Dictation converts your words into text. OS X Yosemite also adds more than 50 editing and formatting commands to Dictation. So you can turn on Dictation and tell your Mac to bold a paragraph, delete a sentence, or replace a word. You can also use Automator workflows to create your own Dictation commands.
Contrast Options
If a higher contrast or a lack of color helps you better see what’s on your display, OS X lets you invert colors or enable grayscale onscreen. Once you set your preferences, they apply systemwide, so you get the same view in every app. You can also turn on Increase Contrast to enhance definition and reduce transparency in some apps.
Cursor Size
OS X lets you magnify your cursor so it’s easier to see where you are and follow along as you move around your Mac. Set the cursor size once and it stays magnified even when its shape changes.
Here are a bunch of articles about Yosemite – the new version of Mac OS X – which was released last week.
Links and videos for helpful tips and tricks on customizing Yosemite
Display Options in OS X Yosemite - YouTube
https://m.youtube.com/watch?v=m1Aa6jsqwvg
Customizing Yosemite for a Low Vision User (Yosemite Accessibility Overview) | The Website of Luis Perez
http://luisperezonline.com/2014/10/18/customizing-yosemite-for-a-low-vision-user-yosemite-accessibility-overview/ Dictation Commands in OS X Yosemite | The Website of Luis Perezhttp://luisperezonline.com/2014/10/20/dictation-commands-in-os-x-yosemite/ 'OK, Mac': Using Automator’s Dictation Commands, new in Yosemite | Macworldhttp://www.macworld.com/article/2834532/ok-mac-using-automators-dictation-commands-new-in-yosemite.html Top 10 Hidden Features of OS X Yosemitehttp://lifehacker.com/top-10-hidden-features-of-os-x-yosemite-1646774857 OS X Yosemite for the Low Vision User - Blindpodcaster | Blindpodcasterhttp://blindpodcaster.com/os-x-yosemite-whats-in-store-for-low-vision-users/ rMac OS X 10.10 Yosemite Accessibility Roundup.
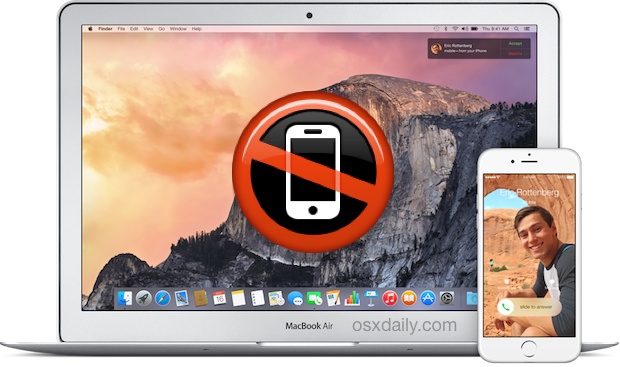
Perhaps you have noticed that since updating your Mac to OS X Yosemite, when your iPhone gets an incoming phone call, so does your Mac. In fact, all of your Macs running the latest OS X and using the same Apple ID will get a phone call, creating a whole chorus of ringing, just from a single iPhone call. While many users will enjoy this feature, which lets you both make and receive phone calls from an iPhone through the Mac by using the computers microphone and speakers, it can also be a nuisance if you’d rather just use your iPhone as a phone. Fortunately, this setting is easily to adjust to suit your preferences.
Do note that by stopping the Mac from ringing with an iPhone phone call, you’ll also prevent the Mac from being able to make outbound calls using the iPhone. There’s not much of a way to get around that, aside from adjusting the notification preferences for FaceTime, which we’re not going to cover specifically here.
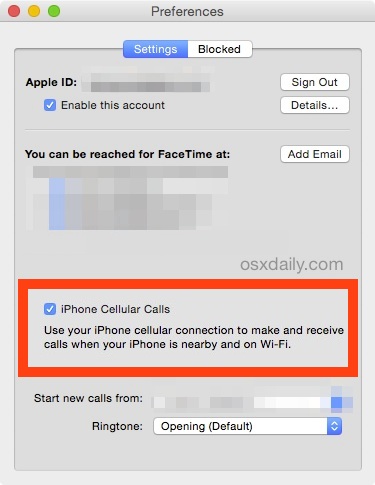
disable calls to your iPhone from ringing on your Mac, you need to visit the FaceTime preferences. That may sound a little strange at first, but recall that FaceTime in OS X also has VOIP voice calling ability, making it a reasonable location for the setting.
Open the “FaceTime” application on the Mac
Pull down the FaceTime menu and choose “Preferences”
Under the primary Settings tab, uncheck the box for “iPhone Cellular Calls”
FaceTime
This will prevent the Mac from ringing and any notifications from coming to the Mac that the iPhone has a phone call. It will not impact other FaceTime features and the ability to make FaceTime audio or video calls.
Realistically-aiala=alally, this feature is very useful and quite nice to have, but it’s best used on a limited basis. For example, maintaining the feature on your primary iPhone and primary Mac, but disabling it on other devices.
Many users have noticed that after they’ve updated their Mac to the latest version of OS X, and their iPad and other iDevices to the latest versions of iOS, suddenly they have an entire symphony of ringing when just their iPhone gets a call. If you’re annoyed by this on your other devices, you can also stop other iOS devices from ringing too when the iPhone gets a call.
Wen you updated to iOS 8, recent iPhones and iPads will play nicely with each other, allowing users to do new functions like answering a phone call or sending an SMS message via their iPhone without having to put down their iPad, or start an email on one device before finishing it on the other.
Please note that some devices are having issues using the Continuity feature.
Apple has dubbed this seamless integration "Continuity," and some of it works immediately once all of a user's devices are updated to iOS 8. For example, if a user has the same Apple ID and associated phone number enabled on their iPad, calls will show up on the tablet once the iPhone begins ringing.
Answering a call on an iPad automatically places the conversation in speakerphone, allowing the iPad's microphone and speakers to handle the call. Continuity requires an iPhone 5 or later, fourth-generation iPad or newer, iPad mini, or fifth-generation iPod touch.
iOS 8 also allows users to automatically enable Personal Hotspot from a nearby iPhone, in a feature Apple calls "Instant Hotspot." A Continuity-capable iPhone will appear under the Wi-Fi section of the Settings app on iPad, and selecting that device will switch Personal Hotspot on, allowing a user to access mobile data from their cellular provider when possible.
The iPad also gains the ability with iOS 8 to send traditional SMS text messages via a connected iPhone. Previously, users could only said iMessages to Apple devices. While SMS messaging was available to test in iOS 8 beta releases, it is not included in the final release, and Apple has said it will become active in October.
All of this same functionality will be coming to newer Bluetooth Low Energy capable Macs later this year with the launch of OS X Yosemite, which will also be a free update.
Additional Continuity features in iOS 8 are available by enabling the "Handoff" feature. Users can do this by opening the Settings application, choosing General, and then selecting "Handoff & Suggested Apps."
"Handoff lets you start something on one device and instantly pick it up on other devices using your iCloud account," Apple's description reads. "The app you need appears in the lock screen, app switcher, and the dock on a Mac."
For example, if a user is reading a website on their iPhone running iOS 8, they can quickly switch to their iPad by swiping up from the small Safari icon that is displayed in the lower right corner. Doing so will immediately open the same website on the iPad.
In addition to Safari, this functionality works immediately with Mail, Pages, Numbers, Keynote, Maps, Messages, Reminders, Calendar, and Contacts. Developers will be able to add Handoff into their own third-party apps as well.
The "Suggested Apps" function also utilizes a user's location to recommend applications. For example, if a user is at a Best Buy retail store, iOS 8 will display an App Store icon in the lower left corner of their iPhone lock screen. Swiping up will take the user to the App Store listing for the official Best Buy app.
If the Best Buy application is already installed, the icon for it will be displayed in the lower left corner, giving the user quick access to the app while they are in the store. This will help expand iBeacon functionality, which requires third-party applications to be installed to access unique functions.