There are lots of accessibility options available in iOS that a lot of people overlook. One of those is Speak Selection which adds the ability for your iPhone or iPad to read back text to you. Opposed to voice over functionality which speaks everything you tap, Speak Selection can be activated but is only triggered when you choose to activate it.
Here's how to set it up and use it.
How to enable Speak Selection on iPhone and iPad
How to use Speak Selection on iPhone and iPad
How to enable Speak Selection on iPhone and iPad
Launch the Settings app from the Home screen of your iPhone or iPad.
Now tap on General.
Scroll down and towards the bottom, tap on Accessibility.
Tap on the Speak Selection option and turn it to On.
You can further customize the speed at which your iPhone or iPad reads the text and the dialect it uses. Once you're done, just tap the Home button to return to the Home screen.
How to use Speak Selection on iPhone and iPad
Launch the app containing the text you'd like your iPhone or iPad to speak back to you.
Hold your finger down on the text you'd like it to read to pull up the copy/paste menu.
Highlight the text and in the text edit popup, select Speak.
Your iPhone or iPad will now speak the text back to you.
To see more iPhone and iPad Apps For Blind And Visually Impaired please go to iPhone and iPad Apps For Blind And Visually Impaired or iPhone and iPad Apps for the Blind And Visually Impaired at Google+
Like watching television ,but have a hard time reading the channel listing on your tv? Now you can see what time your favorite shows are on and you can even customize you're channel listings according to your preferences . https://itunes.apple.com/us/app/tv-guide-mobile/id333647776?mt=8
How to share a contact card via iMessage using the iOS Contacts app
Launch the Contacts app on your iPhone or iPad and find the contact you'd like to share. On the iPhone you can alternately use the Phone app if you'd prefer.
Now tap on Share Contact towards the bottom.
Tap on Message.
Type the name of the person you'd like to share it with and select them.
Now tap Send.
How to Add a contact card via after receiving it in A iMessage
1.Tap on the contact card.
2. The contact card will pop up. Scroll down
3. If you want to create a new contact with that card choose crate new contact.
Or to add it to a existing contact. Choose add to existing contact. And find the contact you want to add it to.
With the release of iOS 7, Apple has added many new accessibility features that make an iPhone and iPad easier to use for people with disabilities.
NEW IOS 7 ACCESSIBILITY FEATURES The accessibility settings are still located under the general menu but the Accessibility option menu item is located closer to the top of the list. In previous versions, this menu option was near the bottom of the list. The shortcut to quickly turn on and off accessibility features has been renamed from Triple Click Home to Accessibility Shortcut. It still works the same way – you triple click the home button to show the menu options. In iOS 7 there is a new accessibility shortcut menu item to turn on switch controls.
Siri
New Siri commands allow users to enable some accessibility options, such as “turn on VoiceOver” and “Open accessibility settings” (iOS 7 SIri Command List)
Expressive voices - Siri’s voice output is now independent of VoiceOver
Visual Accessibility Features
VoiceOver
New gestures
Four finger double tap – starts or stops VoiceOver help
Quadruple three finger tap – copy the last spoken text to the clipboard
Tap the status bar and swipe up with three fingers – start the control center (to exit do a two finger scrub on the home screen)
Press the home button and tap on the screen - unlock the screen
Double tap with two fingers (when in a form field) – allow the user to dictate in the edit field; performing the gesture again will finish the speaking
New rotor settings
Handwriting – option for both writing and navigation.
Writing – a three finger swipe up and down will change the case of the letter, a two finger swipe right will input a space, and a two finger swipe left will backspace
Navigation – drawing a letter on the screen will find matching apps that start with that letter. When in Safari, writing a letter will start that rotor option.
Sound effects – turn on and off VoiceOver specific sound effects
New phonetics options – off, character and phonetics, and phonetics only
Enhanced voice and language support – in the settings a user can install more than one speech synthesizer and select the dialect (e.g. U.S. English, Australian English)
Large cursor option – displays a larger and thicker cursor for VoiceOver
Math input support using Nemeth Braille in VoiceOver
Web content on Safari
Some accessibility improvements with the announcement of various ARIA roles
Type adjustments – users can now adjust the boldness and type size
Increase contrast toggle
On/Off labels – add a small 0 or 1 to indicate when the control is in the on or off position
Reduce motion – adjusts the colors to improve certain color combinations where the text appears to move
Hearing Accessibility Features
Subtitles and captions option – now relocated to the Accessibility settings; this is a global setting that will apply to all videos
Style for captions – there are several styles to choose from or you can create a new style
Learning Accessibility Features
Guided Access
Allows the disabling of the Sleep/Wake and Volume buttons
Developers can now hide parts of the screen when this feature is turned on to reduce distractions for users
Speak Selection
Now has enhanced language support including different speaking rates for supported languages
Additional voices can also be downloaded that are more natural sounding and are easier to understand
Built-in Dictionary
Additional languages can be downloaded
Support for foreign languages
Motor Accessibility Features
My favorite new enhancement in iOS 7 is the new switch support which will allow users with mobility impairments to interact with the device using external switches, screen taps or through head motions.
Switch Support
Users can connect one or more switch devices and set the desired action for the switch
Three different types of switches: external switches, screen and camera for head motion
Desired scanner or system action for the switch can be set by the user
Scanner options: select item, scanner menu, resume auto scanning, move to next item, move to previous item, and stop scanning
System options: tap, app switcher, home button, notification center, Siri, decrease volume and increase volume
Many options available to customize the experience when using switches
Switch support is now included on the accessibility shortcut menu
New external switch devices (not included with iOS 7, these are external devices that can be purchased)
Apple has done a great job with the accessibility features in iOS 7. If you have not downloaded the new version, we highly recommend it. As we learn about new features, we will update this blog post.
Not;This must be done with voice over on, it will not work with it off.
1.Go to a picture in your camera roll. Make sure that you hear the photo label as is, four example: Time and date of the picture.
2. Tap your picture with two fingers and hold it. You are going to hear 3 beep tones then release your fingers. 3.The voice over will say,"Alert, label element,editing texting...", now you are able to text in what ever you want about that picture, then press save. Now when you go to that picture, and press it, it will speak out what you typed.
BlindSquare is an augmented reality GPS application for the blind.
It obtains information about the surrounding environment from FourSquare and Open Street Maps. It's algorithms enables it to determine the most relevant information, and then voices it out using high quality speech synthesis. For example, "What's the most popular café within 200 meters radius?"
If you are riding a bus, it will report your location, e.g. the next bus stop or the next street crossing.
When you set up a new iOS device or need to restore information on one you already have, your iCloud backup makes it easy.
Restore from an iCloud backup
On your iOS device, go to Settings > General > Software Update. If a newer version of iOS is available, follow the onscreen instructions to download and install it. You must update your device to the latest version of iOS to make sure you can restore from a recent backup of another device, such as a lost or broken device. Please note step one may or may not apply to what you're doing. Personally I would decide if I want to update or not. You may or may not be forced to do that.
Make sure you have a recent backup to restore from.
Go to Settings > iCloud > Storage & Backup, then look at the bottom of the screen for the message Last Backup, followed by the date of the latest backup.
Go to Settings > General > Reset, then tap “Erase all content and settings.”
In the Setup Assistant, proceed to “Set up your device,” tap Restore from a Backup, then sign in to iCloud.
Proceed to “Choose backup,” then choose from a list of available backups in iCloud.
After using an iCloud backup to restore a device:
Your settings and accounts are restored from the iCloud backup you chose. Your device restarts and begins downloading your purchased music, movies, TV shows, apps, books, Camera Roll, and other content. If your device can’t download the version of an app that was backed up, it downloads the latest version.
Your purchased content is automatically downloaded from the iTunes Store, App Store, or iBooks Store based on iTunes in the Cloud availability by country. Previous purchases may be unavailable if they have been refunded or are no longer available in the store.
You may be asked to enter passwords for iTunes, App Store, and iBooks Store accounts to restore purchased items.
Progress bars appear below Home screen icons for apps being downloaded.
To make an app a priority for downloading, tap its icon.
To check if the information on your device is fully restored, go to Settings > iCloud > Storage & Backup.
If you subscribe to iTunes Match, you can download your songs, albums, and playlists from iCloud after other information on your device is fully restored.
Note: You can restore information on your iOS device from an iTunes backup instead of an iCloud backup. For information, see the iTunes Help topic Back up your iPod touch, iPhone, or iPad.
To back up an iOS device to iCloud, you need to first turn on this feature.
Back up from a Mac: You can do this from iTunes when the device is connected to your Mac. Click the device’s name, then the Summarytab. In the Backups section, underAutomatically Back Up, choose theiCloud option. I recommend you check Encrypt iPhone Backup, because this will also store your passwords; you’ll need to enter a password to do this.
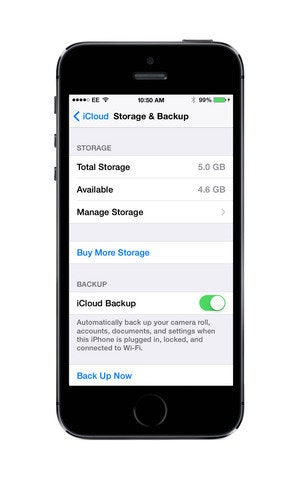
Back up from an iPhone or iPad:You can also turn on iCloud backups from your iOS device. Go to Settings > iCloud > Storage & Backup, then toggle the iCloud Backup switch on. As the above screenshot says, your device will automatically back up your camera roll, accounts, documents and settings content when it is plugged in, locked, and connected to Wi-Fi.
Back up manually: You may also want to back up your iOS device manually to iCloud, for instance when you’re on the road and haven’t backed up in a while or when you’ve been working away from a power source. To do this on your iOS device, tap Back Up Now just below the toggle switch; if you’re connected to Wi-Fi, your iOS device will back up.
Note that Apple says if you don’t back up your device for 180 days or more, the company will delete your device’s iCloud backup files.
Manage your backups
Say you’ve got a 64GB iPhone. How can you back up all that content to a 5GB iCloud account? You can’t, and you don’t. iCloud automatically backs up the following items:
Photos and videos in your Camera Roll
Device settings
App data
Home screen and app organization
iMessage, text (SMS), and MMS messages
Ringtones
Visual Voicemail
Apple also stores the most recent 1,000 photos from your Photo Stream, if that iCloud feature is turned on. (Go to Settings > iCloud > Photos and then toggleMy Photo Stream.) These images don’t count against your storage quota, but they will only remain in iCloud storage for 30 days, since you’re expected to download them to your computer. Set everything up right and this will happen automatically; check out our article “Up and running with Photo Stream" to learn the basics.
Also, your device won’t back up the music you sync, or the apps on your device. In fact, it doesn’t back up any media. Apple says that iOS devices back up “purchased music, movies, TV shows, apps, and books,” but what’s actually saved are links to those items in the iTunes Store, App Store, and iBookstore. None of that counts against your iCloud storage.
If you have to restore your iOS device from an iCloud backup, you’ll re-download those items from their respective stores. This means, of course, that you’ll save space. You will not, however, have backups of any non-purchased items. Hopefully, you have those on your Mac in your iTunes library.
Axe app backups that you don’t need
Can you download that digital magazine again? Is an app already backed up to Dropbox? If so, toggle off its iCloud backup here.
Since iCloud storage is limited, it pays to be choosy about what else your device backs up. On your iPhone or iPad, tap Settings > General > Usage and then scroll down to Manage Storage. All the devices associated with your Apple ID will appear here. Tap the one you’re interested in to see the date of its latest backup and the backup’s size. Under Backup Options, you can turn off backups for individual apps using the toggle buttons.
In the screenshot above, you can see that The Loop Magazine takes up 24MB of my iCloud storage space. Turning this option off saves about 10 percent of my total backup. Since I can easily re-download issues of this magazine, I don’t really need to back it up at all.
Scroll down the list, tap Show All Apps, and then turn off any apps that you don’t need backed up. For starters, look for apps that sync data to Dropbox or some other cloud service.
Back up wisely
iCloud backups are great, and can save your bacon in an emergency. If you use too much storage, you can always buy more: An additional 10GB costs $20 per year, an additional 20GB costs $40 per year, and an additional 50GB costs $100 per year. But before you do, check to see if you can trim some fat.